Specifying the Static IP Address
You're now just about ready to assign a static IP address to your Windows 7 computer. The last bit of information you need to know is the IP address to use. This is important because you don't want to use an address that your router has already assigned to another computer. The easiest way to do this is to choose an address outside of the DHCP server's range. For example, if you configured the DHCP server to assign addresses from the range 192.168.0.100 to 192.168.0.150, an address such as 192.168.0.50 or 192.168.0.200 will work. (Remember, too, not to use the address assigned to your router.)
TIP It's probably a good idea to check your router's DHCP table to see which addresses it has assigned. See your router documentation to learn how to do this.
With an IP address in hand, follow these steps to assign it to a network connection in Windows 7:
- Open the Network Connections window, as described earlier.
- Select the connection you want to work with.
- In the taskbar, click Change Settings of This Connection. (You can also right-click the connection and then click Properties.) Windows 7 display's the connection's Properties dialog box.
- In the Networking tab's list of items, select Internet Protocol Version 4 (TCP/IPv4).
- Click Properties to display the Properties dialog box for Internet Protocol Version 4.
- Click to activate the Use the Following IP Address option.
- Use the IP Address box to type the IP address you want to use.
- Use the Subnet Mask box to type the IP addresses for the subnet mask. (Windows 7 should fill this in for automatically; the most common value is 255.255.255.0.)
- Use the Default Gateway box to type the IP address of your network's router.
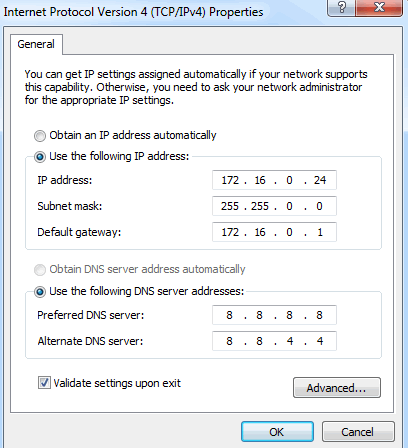
- Use the Preferred DNS Server and Alternate DNS Server boxes to type the IP
addresses of your ISP's DNS servers. Figure below shows a completed version of the
dialog box.

- Click OK to return to the connection's Properties dialog box.
- Click Close.
In this tutorial:
- Setting a Small Network
- Setting Up a Peer-to-Peer Network
- Changing the Computer and Workgroup Name
- Connecting to a Wireless Network
- Working with Windows 7's Basic Network Tools and Tasks
- Accessing the Network and Sharing Center
- Setting Up a Homegroup
- Activating Homegroup Connections
- Creating a Homegroup
- Joining a Homegroup
- Accessing the Homegroup
- Changing Homegroup Settings
- Turning Off Homegroup Connections
- Viewing Network Computers and Devices
- Displaying a Network Map
- Viewing Network Status Details
- Customizing Your Network
- Managing Network Connections
- Opening the Network Connections Window
- Renaming a Network Connection
- Enabling Automatic IP Addressing
- Confirming That Windows 7 Is Configured for Dynamic IP Addressing
- Displaying the Computer's Current IP Address
- Setting Up a Static IP Address
- Displaying the Current DNS Addresses
- Specifying the Static IP Address
- Using a Network Connection to Wake Up a Sleeping Computer
- Disabling a Network Connection
- Managing Wireless Network Connections
- Opening the Manage Wireless Networks Window
- Creating an Ad Hoc Wireless Network
- Working with Wireless Connection Properties
- Modifying Connection Properties
- Modifying Security Properties
- Renaming Wireless Connections
- Reordering Wireless Connections
- Creating User-Specific Wireless Connections
- Removing Wireless Connections
