
Set a Specific Area to Print
Highlight the area you want to print. Choose Page Layout> Page Setup> Print Area> Set Print Area. Dotted lines appear around the print area. When you print the worksheet, only the area contained within the dotted lines prints.
Whenever you fool with the Print Area, you need to keep in mind that after you define it, its cell range is the only one you can print (regardless of what other Print What options you select in the Print dialog box) unless you click the Ignore Print Areas check box and until you clear the Print Area.
To clear the Print Area (and therefore go back to the printing defaults Excel establishes in the Print dialog box) you just have to click Print Area | Clear Print File on the Page Layout tab or simply press Alt+PRC.
You can also define and clear the Print Area from the Sheet tab of the Page Setup dialog box opened by clicking the Dialog Box launcher in the Page Setup group on in the Ribbon's Page Layout tab. To define the Print Area from this dialog box, click the Print Area text box on the Sheet tab to insert the cursor and then select the cell range or ranges in the worksheet (remembering that you can reduce the Page Setup dialog box to just this text box by clicking its minimize box). To clear the Print Area from this dialog box, select the cell addresses in the Print Area text box and press the Delete key.
Adjust the Paper Orientation and Size
- Choose Page Layout> Page Setup> Orientation.
- Select whether you want a Portrait or Landscape orientation.
- Choose Page Layout> Page Setup> Size. A drop-down list of paper sizes appears.
- Select a paper size. The paper size choices you see depend on the printer you use. The two most common US choices are Letter, which is 8.5 inches by 11 inches, and Legal, which is 8.5 inches by 14 inches.
Getting the lay of the landscape
The drop-down menu attached to the Orientation button in the Page Setup group of the Ribbon's Page Layout tab contains two options:
Portrait (the default) where the printing runs parallel to the short edge of the paper.
Landscape where the printing runs parallel to the long edge of the paper Because many worksheets are far wider than they are tall (such as budgets or sales tables that track expenditures over all 12 months), you may find that their worksheets page better if you switch the orientation from the normal portrait mode (which accommodates fewer columns on a page because the printing runs parallel to the short edge of the page) to landscape mode.
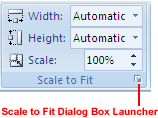
Make Worksheets Fit Better on a Page
- Choose Page Layout> Scale to Fit and then click the Scale to Fit dialog box launcher.
- he Page Setup dialog box opens. From the Scaling area, make a selection from the options.
Adjust To:
Enlarge or shrink the printed font size by setting a percentage option between 10 and 400.
Do not try to shrink the document too much. Because Excel shrinks the font, trying to fit too much on a page can make the document typeface too small to read.
Fit To:
Force Excel to a specified number of pages wide and high. - Click ok.