Print Worksheets and Charts
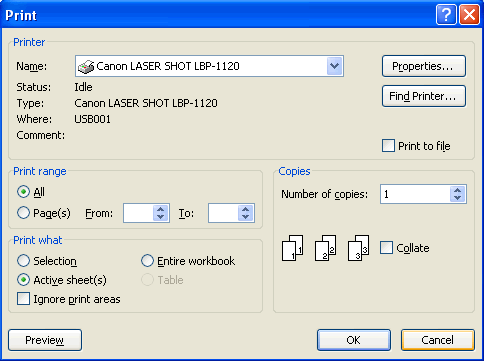
- Choose Office & Print. The Print dialog box appears.

Choose from the following options:
Name:
Select a printer different than the default printer.
All:
When the All option button is selected, all the pages in your document will print. Because this is the default choice, you would only need to select it if you previously printed a portion of the document by selecting the Page(s) option button.
Page(s):
Normally, Excel prints all the pages required to produce the information in the areas of the workbook that you want printed. Sometimes, however, you may need to reprint only a page or range of pages that you've modified within this section. To reprint a single page, enter its page number in both the From and To text boxes here or select these page numbers with the spinner buttons. To reprint a range of pages, put the first page number in the From text box and the last page number in the To text box. Excel automatically deselects the All option button and selects the Page(s) option button in the Page Range section as soon as you start typing in the From or To text boxes.
Selection:
Select this option button to have Excel print just the cells that are currently selected in your workbook. (Yes, you must remember to select these cells before opening the Print dialog box and choosing this printing option).
Active Sheet(s):
Excel automatically displays and selects this option button and prints all the information in whatever worksheets are selected in your workbook. Normally, this means printing just the data in the current worksheet. To print other worksheets in the workbook when this option button is selected, hold down Ctrl while you click the sheet's tab. To include all the sheets between two sheet tabs, click the first one and then hold Shift while you click the second tab (Excel selects all the tabs in between).
Entire Workbook:
Select this option button to have Excel print all the data in each of the worksheets in your workbook.
Table:
Select this option button to have Excel print only the data range that you formatted as a table. Note this option button remains grayed out and unavailable if your worksheet doesn't contain any tables.
Ignore Print Areas:
Click this check box to put a check mark in it when you want one of the other Print What options (Selection, Active Sheet(s), or Entire Workbook) that you selected to be used in the printing rather than the Print Area you defined.
Number of Copies:
To print more than one copy of the report, enter the number of copies you want to print in the Number of Copies text box in the Copies section - or use the spinner buttons to select the required number.
Collate:
When you collate pages, you simply make separate stacks of each complete report, rather than print all copies of page one, and then all copies of page two, and so on. To have Excel collate each copy of the report for you, select the Collate check box in the Copies section to put a check mark in it.
After you finish choosing new print options, you can send the job to the printer by clicking OK or pressing Enter. To use another printer that's been installed for Windows (Excel lists the current printer in the Name text box and all printers installed for Windows on the Name pop-up list), select the new printer on the Name drop-down menu in the Printer section at the top of the dialog box before you start printing.
To open the report in the Print Preview window for last-minute checking before sending it to the printer, click the Preview button.
Optionally, print the worksheet immediately by clicking the Print button on the Quick Access toolbar.
If you don't realize that you want to cancel the print job until after Excel finishes shipping it to the print queue (that is, while the Printing dialog box appears on-screen), you must open the dialog box for your printer by clicking and cancel printing from there:
- Click the printer icon in the Notification area at the far right of the Windows Vista or XP taskbar (to the immediate
left of the current time) with the secondary mouse button to open its shortcut menu.
This printer icon displays the screen tip 1 document(s) pending for so-and-so. For example, when I'm printing, this message reads 1 document(s) pending for Greg when I position the mouse pointer over the printer icon. - Right-click the printer icon and then select the Open Active Printers command from its shortcut menu. This opens the dialog box for the printer with the Excel print job in its queue (as described under the Document heading in the list box).
- Select the Excel print job that you want to cancel in the list box of your printer's dialog box.
- Choose Document> Cancel from the menu bar.
- Wait for the print job to disappear from the queue in the printer's dialog box and then click the Close button to get rid of it and return to Excel.
