Preview Before Printing
Save wasted paper and your sanity by using the Print Preview feature before you print any worksheet, section of worksheet, or entire workbook. Because of the peculiarities in paging worksheet data, check the page breaks for any report that requires more than one page. Print Preview shows you exactly how the worksheet data will be paged when printed and you can make last minute changes to the page settings before sending the report on to the printer when everything looks okay.
Click the Office Button then click the arrow next to Print and select Print Preview or press Alt+FWV. Excel displays the first page of the report in a separate window with its own Print Preview contextual tab. When positioned over the spreadsheet, the mouse pointer becomes a magnifying glass.
When Excel displays a full page in the Print Preview window, you can barely read its contents; increase the view to actual size if you need to verify some of the information. Zoom up to 100 percent by clicking the previewed page with the magnifying glass mouse pointer or by clicking the Zoom button in the Print Preview tab on the Ribbon.
To return to the full-page view, click the mouse pointer (in its arrowhead form) anywhere on the page or click the Zoom command button on the Print Preview tab on the Ribbon.
Excel indicates the number of pages in a report on the Status bar of the Print Preview window (at the far-left bottom of your Excel screen). If your report has more than one page, view pages that follow by clicking the Next Page button in the Preview group of the Print Preview tab on the Ribbon. To review a page you've already seen, back up a page by clicking the Previous Page button immediately below it. (The Previous button is grayed out if you're on the first page.) You can also advance to the next page by pressing the Page Down key or move back to the previous page by pressing the Page Up key when the page view is full-page rather than actual size.
When you finish previewing the report, the Print Preview tab offers you following options:
Print command button in the Print group to display the Print dialog box and print the report from the normal worksheet view.
Page Setup command button in the Print group to open the Page Setup dialog box where you can take care of paging problems by choosing a new paper size, page order, orientation, or margins, or if you notice a problem with the header or footer (the text you enter in the top or bottom margin of the pages).
Show Margins check box in the Preview group to display markers for the current top, bottom, left, and right margins that you can then adjust by dragging them.
Click the Zoom button to enlarge the view. Click a second time to reduce the view.
Close Print Preview command button in the Preview group to close the Print Preview window and return to the previous worksheet view.
Add a Manual Page Break
The Page Break preview feature in Excel enables you to spot and fix page break problems in an instant, such as when the program wants to split information across different pages that you know should always be printed together on the same page.
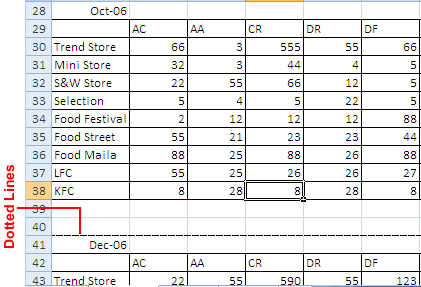
Click a cell in the row where you want the new page to begin. Choose Page Layout> Page Setup> Breaks> Insert Page
Break. Dotted page break lines, similar to the ones shown in figure appear.

