Capturing Images Using Microsoft Deployment Toolkit
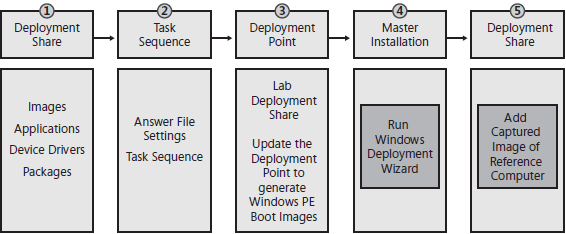
Capturing images using MDT 2010 is essentially a Lite Touch Installation (LTI) process, which ends by capturing a customized image of a master or reference computer that contains applications, language packs, and various other customizations needed. The following list of steps outlines the overall process for using MDT 2010 to create and capture operating system images as illustrated in Figure below:

- Create and configure a deployment share Create a deployment share and then configure the share by adding operating system source files, applications, out-of-box device drivers, and packages to it as needed. The section titled "Creating and Configuring a Deployment Share" later in this tutorial describes this step in detail.
- Create and configure a task sequence Create a task sequence that associates an operating system with an unattended setup answer file (Unattend.xml) to define a sequence of tasks to run during installation. The section titled "Creating Task Sequences" later in this tutorial describes this step in detail.
- Configure and update the deployment share Configure and update the deployment share to update the MDT 2010 configuration files and generate a customized version of Windows PE you can use to boot your reference computer. The section titled "Updating the Deployment Share" later in this tutorial describes this step in detail.
- Run the Windows Deployment Wizard on the reference computer Start your reference computer using the Windows PE image generated when you update your deployment share. Then run the Windows Deployment Wizard on the reference computer to install Windows from your deployment share. During the phase when gathering information, the Windows Deployment Wizard will prompt you to specify whether you want to capture a custom image of the reference computer that you can later deploy to target computers. The section titled "Capturing a Disk Image for LTI" later in this tutorial describes this step in detail.
- Add the custom image as an operating system source After capturing the custom image of your reference computer, you add it to the deployment share as an operating system source.
In this tutorial:
- Developing Disk Images
- Getting Started Developing Disk Images
- Prerequisite Skills and Lab Requirements
- Installation Media
- Capturing Images Using Microsoft Deployment Toolkit
- Creating and Configuring a Deployment Share
- Adding Operating Systems
- Adding Applications
- Specifying Application Dependencies
- Adding Packages
- Creating Task Sequences
- Editing a Task Sequence
- Configuring Group and Task Properties
- Configuring the Options Tab
- Task Sequence Variables
- Operating System Versions
- Updating the Deployment Share
- Capturing a Disk Image for LTI
- Preparing Images Manually
- Customizing Microsoft Deployment Toolkit
