
Uninstalling Software
As you know, many programs come with their own installation (Setup) programs that handle all the details of installation, such as file copying, making Registry additions, making file associations, and adding items to the Start menu. An ever-growing number of applications even provide their own uninstall routine, which appears as a unique icon within their Start menu folder. But sometimes programs do not come with built-in uninstallers, or you just want Windows to handle these uninstalls.
Most modern applications are written in compliance with the Microsoft Windows standards for installation and removal. Thus, you see them in your installed applications list in the Programs and Features applet. This list is mainly the result of the PC software industry's response to kvetching from users and critics about tenacious programs that are difficult to root out after they're installed. Some ambitious programs spread themselves out all over your hard disk like oil on your garage floor with no easy way of reversing the process. Users complained about the loss of precious disk space, unexplained system slowdowns, and so forth.
Tip Never attempt to remove an application from your system by deleting its files from the \Program Files folders (or wherever). Actually, "never" may be too strong. Removal through manual deletion should only be a last resort. Always attempt to use the Programs and Features applet or the uninstall utility from the application first.
To uninstall software, follow these steps:
- Click Start, Control Panel, Programs, Programs and Features.
- Select the program you want uninstalled or changed.
- Click the Uninstall button on the toolbar.
- The Programs and Features dialog box appears, asking if you're sure you want to uninstall the program. Click Yes.
- UAC will ask for administrator confirmation if this uninstall is correct. Enter the password, if necessary, and select Yes to the confirmation. The software will uninstall automatically.
Also with Programs and Features, you can turn on or off any Windows feature. Turning off a feature can customize Windows 7 for you. For example, if you are running Windows 7 on your desktop and only use a mouse and keyboard for input devices, you can turn off the Tablet PC Components. You do have the option to turn on any feature that is available as well. It is up to you which functions you want to use.
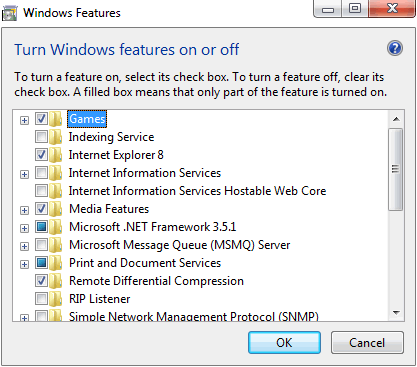
Enabling and disabling features is easy and self-explanatory. Click the Turn Windows Features On or Off link in the Tasks list. If you want to turn on a feature, select the check box next to it to fill in the box. If you do not want a feature, just click the check box to clear it. If you do want to turn off a feature, make sure that you know what you are turning off.
Turning off a feature does not uninstall it completely off your computer as in Windows XP. Instead, it keeps the feature on your hard drive to give you the later option of turning it on. This allows you to turn on and off any feature quickly but does not free up any space on your hard disk.
In this tutorial:
- Windows 7 and Other software Up to Date
- Understanding Windows Live
- Updates versus upgrades
- Why updates are important
- Windows Update
- Windows Update: The essentials
- Types of Updates
- Completing an Update
- Configuring automatic Updating
- Windows Update Applet and Functions
- Manually Install Updates Using Windows Update
- Action Center
- Updates Do Not Install Properly
- Other Windows Update Settings
- Configuring Windows 7 Update to Use a Proxy Server
- Can't Find Hidden Update
- Viewing and Changing Installed Updates
- Can't Uninstall Current Update
- Upgrade Windows Anytime
- Understanding Windows Server Update Services
- Windows Update Policies
- Updating Drivers
- Using Device Manager to Update Drivers
- Windows Update Driver Settings
- Windows 7 Service Packs
- Basic Service Pack Information
- Installation of Service Packs
- Installing and Removing Software
- Installation via CD or DVD
- Problem Installing from Disc
- Installation via Downloaded Program
- Viewing and Changing Programs
- Uninstalling Software
- Compatibility Issues in 64-Bit Version
- Upgrade Issues with 64-Bit Windows 7
- Other Program Compatibility Issues
- Side-by-Side Installs and Virtual Registries
- Removing Updates from Windows 7
- Thwarting Exploits with DEP
- Microsoft Baseline Security Analyzer
- Picking Computers to Scan
- Vulnerability Checks
- Installing MBSA
- Running the MBSA
- Running the MBSACLI
- MBSACLI Location
- Running in an Isolated Environment
- Using Windows Server Update Services
- WSUS Updates
- WSUS Requirements
- Installing, Configuring, and Using WSUS
- Adding the Application Server and Web Server (IIS) Roles
- Installing the Report Viewer
- Installing WSUS
- Configuring Group Policy Settings for WSUS
- Creating a GPO to Configure Clients to Use WSUS
- Verifying That Clients Are Using GPO Settings for WSUS
- Verifying That Clients Are Using GPO Settings with GPResult
- Creating Computer Groups on WSUS
- Approving Updates in WSUS
- Viewing WSUS Reports