
Working with iPhone Contacts
Although contacts are clearly important on the iPhone, when you need to locate someone's name and phone number quickly, they're useful on an iPod touch as well, as you'll want to pull up contacts for map locations as well as find people's FaceTime addresses. You'll find it more convenient to ask your address-book application to do the heavy lifting with regard to creating and editing contacts (because it's far easier to enter information on a real keyboard than on the iPhone's or iPod touch's virtual keyboard), but you can do a lot of worthwhile things with contacts directly on one of these devices.
Entering the people you know
Launch the Contacts app (or, on an iPhone, tap the Contacts icon at the bottom of the Phone app's screen), and you see your contacts listed in alphabetical order, with a Search field at the top of the screen for seeking out contacts.
The Contacts list works very much like any long list of items you'd see in the Music app. A tiny alphabet runs down the right side of the screen. Tap a letter to move immediately to contacts whose names (first or last, depending on how you've configured name sorting in the Contacts preferences screen) begin with this letter. Alternatively, tap the Search field, and when the keyboard swoops up from the bottom of the screen, start typing some letters in your contact's name. As you type, fewer names appear as the choices narrow.
When you tap a name, you're taken to that contact's Info screen (Figure below). Here, you can find information including the following:
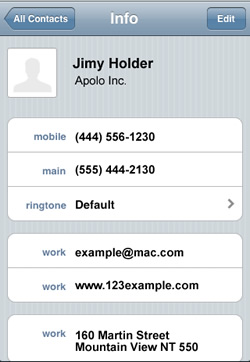
- Photo
This item can be a photo you've added by importing it from Address Book on a Mac, by tapping Add Photo and choosing a picture from your Photos application, or by assigning a picture to a contact in the Photos or Camera app. - Name
- Company
- Phone number
Possible phone headings include (but aren't limited to) Mobile, iPhone, Home, Work, Main, Home Fax, Work Fax, Pager, and Other. - Email address
This item includes Home, Work, and Other options, as well as any custom labels you've created. - Ringtone
- Vibration (iPhone only)
- Text tone (iPhone only)
- URL (for the contact's Web site)
- Address
- Other fields
You won't necessarily find all these entries in a contact's Info screen; this list just shows you what's possible to include.
Organizing contacts in groups
Although you see a list of all your contacts when you first tap Contacts, the Contacts application has an organizational layer above the main list. If, in the Info preference within iTunes, you've chosen to sync your address book with select groups of contacts, or if your full address book contains groups of contacts, those groups appear in the Groups screen, which you access by tapping the Groups button in the top-left corner of the Contacts screen.
Organizing in groups makes a lot of sense if you have loads of contacts. Although Apple made traversing a long list of contacts as easy as possible, easier still is tapping something like a Family group and picking Uncle Bud's name out of a list of 17 beloved relatives.
Making contacts
The best way to become familiar with iPhone and iPod touch contacts is to make some of your own. To do that now, launch the Contacts app and then tap the plus (+) icon in the top-right corner of the screen.
Viewing the New Contact screen
The New Contact screen contains fields for the elements list in "Entering the people you know" earlier in this article, as well as an Add Field entry. To add information to one of these fields, tap the field or the green plus icon to its left. In the resulting screen, you'll find a place to enter the information.
Here are the special features of each screen:
Add Photo: Tap this entry to display a sheet containing buttons marked Take Photo, Choose Photo, and Cancel. Tap Take Photo, point it at the object you'd like to capture, and tap the green camera icon.
Why all the fuss about a contact's picture when it appears in this tiny box? If you've attached a photo to a contact, that photo occupies much of the iPhone's or iPod touch's screen when that person calls you on the phone or via FaceTime.
First and Last Name: In these fields, you enter first and last names.
Company: Enter a company name in this field, if you like.
Phone: As the name implies, this field is where you add a phone number. By default, the sole entry is Mobile. To choose a different kind of phone, tap Mobile; a Label sheet scrolls up from the bottom of the display, letting you choose options from a long list. If you've added any custom labels on the device, in Apple's Address Book (Mac), or in Outlook (Windows), those custom labels appear below the preceding entries. At the very bottom of the sheet, you'll find an Add Custom Label button that, when tapped, lets you type a label of your own making-Dirigible or Private Train Car, for example.
Note:
The numeric keypad contains a key that reads +*#. Tap it, and these three characters appear on the keypad's bottom three keys, along with the word pause, which enters a comma (,) character. What good are they? They're used by automated answering systems for performing certain functions. Some phone systems, for example, require you to press the pound key and then a key combination to unblock a hidden phone number or append an extension. The comma character is commonly used to insert a 1-second delay. It's useful when an automated answering service demands that you wait a second before punching in another string of numbers.
Email: Enter your contact's email addresses here. The device's keyboard in this screen contains @ and period (.) keys to make the process easier. Tap and hold the period key, and a menu appears that contains .net, .edu, .org, .us, and .com. Just slide your finger over to the extension you want, and let go to enter it. As with adding a phone number, you can tap the Home entry and choose a different name from the Label sheet that appears.
Ringtone: You can choose a unique ringtone for each contact, and here's where you do it. Tap Ringtone, and the default ringtone for your device appears at the top of the ringtone list with a check mark next to it. You can choose a different ringtone from the list below-a list that includes the 25 ringtones and 27 alert sounds bundled with your device, followed by any custom ringtones you've added via iTunes' Ringtones tab. If you have an iPhone, this feature is a great way to know who's calling without having to pull the phone out of your pocket.
Vibration (iPhone only): Create a custom vibration on your iPhone. This entry is the doorway to that feature. Tap Vibration and then choose one of the five bundled vibration patterns, create or choose one of your own, or choose None.
Text Tone: As with other audio alerts, choose a different ringtone, alert, or custom sound here.
Home Page: This entry is for entering the URL (Web address) associated with the contact. Here, too, the keyboard has been changed to be more convenient for entering Web addresses, in that it contains period (.), slash (/), and .com keys. You can apply a Home Page, Home, Work, or Other label to the URL, as well as any custom labels on your phone.
Add New Address: In the United States, the default Edit Address screen contains Street, City, State, and Zip fields. Ah, but if you tap the Country field and choose a different nation from the list that appears, the other fields change. If you choose Belarus, for example, the fields include Street, Postal Code, City, and Province. Tap the Location icon next to the Country icon to choose the nature of this address: Home, Work, or Other and (as you might expect) one of those custom labels.
Add Field: Tap Add Field, and you can add more fields to a contact's Info screen. These fields include Prefix, Phonetic First Name, Phonetic Last Name, Middle, Suffix, Nickname, Job Title, Department, Twitter, Profile, Instant Message, Birthday, Date (Anniversary and Other are the options), Related People, and Notes. Both the Birthday and Date screens contain the device's spinning date wheel for selecting the month, day, and year quickly.
Managing existing contacts
When you have contacts on your iPhone or iPod touch, you can delete them, edit the information they contain, or use that information to perform other tasks on your device.
To delete a contact, just tap the Edit button that appears in the contact's Info screen, scroll to the bottom of the screen, and tap the big red Delete Contact button. You'll be asked to confirm your choice.
To edit a contact, tap that same Edit button in the contact's Info screen, and make the edits you want. You can add information by tapping a field that begins with the word Add (or just tap its green plus icon). To delete information, tap the red minus (-) icon next to the information and then tap the now-revealed Delete button. When you're finished editing the contact, tap Done.
As for initiating actions on your iPhone or iPod touch via a contact's Info screen, most of the elements in the screen are live, meaning that if you tap them, something happens. If you tap a phone number in the Info screen on an iPhone, for example, the iPhone dials that number; tap an email address, and a New Message window appears in the Mail application, addressed to that person. If you tap a URL, Safari opens and takes you to that Web page. Tap an address, and Maps opens to show you its location.
At the bottom of an Info screen that contains at least one phone number, you'll find Send Message, Share Contact, FaceTime, and Add to Favorites buttons. Because Message, FaceTime, and Add to Favorites require a phone number or email address, you can see why they're present here but not in Info screens that don't bear phone numbers or email addresses. Share Contact appears for all contacts and, again, offers you the option to send an email or message that contains that person's contact information in the form of a vCard.
You already know about favorites. When you tap Send Message, if the contact has more than one phone number or email address in the Info screen, a sheet rolls up that contains each phone number and email address. Tap the number or address you'd like to use, and the Messages application opens, with the contact's name at the top of the screen.