
Managing Your Calling Plan
When the iPhone first hit the street, Apple placed the Phone application's icon in prime position: in the first spot among the four major apps at the bottom of the Home screen. Tap that Phone icon, and you see one of the five Phone application screens: Favorites, Recents, Contacts, Keypad, or Voicemail. (Which screen appears depends on the last one you accessed before moving back to the Home screen or to another application.) A row of buttons at the bottom of all five screens lets you navigate quickly among these screens. Because you may be in a hurry to place a call, I will discuss them out of order.
Keypad
The function of this button couldn't be much more obvious. Tap Keypad, and you see . . . a telephone keypad. To place a call, just tap the digits you want. As you tap, each digit appears in order at the top of the screen, nicely formatted with the area code in parentheses followed by the number-(214) 444-0989, for example.
In addition to the number keys, star (*), and pound (#), the keypad includes these buttons:
- Add Contact
The Add Contact button lets you create a contact quickly, based on the number you've tapped in.
Suppose that your dentist calls and leaves a message: He needs a new boat, and your previously unmentioned impacted wisdom tooth will help him with the down payment. He asks you to call him back at 4444-9989. You tap in the number, tap Add Contact, and then choose Create New Contact if you have no contact for him or Add to Existing Contact if you don't have his new office number. (Or you can tap Cancel if you've thought better of the whole thing.) - Call
Tap Call to call the number you've entered. - Delete
Tap Delete to erase the last digit you entered. Tap and hold to delete a string of numbers quickly.
Voicemail
The iPhone offers a unique voice-mail system dubbed Visual Voicemail. What makes it different from other phones' systems is that you need not wade through half a dozen messages to get to the one you really want to hear. Instead, all received messages appear in a list, and you tap just the ones you want to listen to.
No one can be available 24 hours a day, so here's how to set up and use voice mail when you're not available to take a call:
- Tap the Voicemail button at the bottom of the Phone screen.
When you first tap Voicemail, you will be prompted to enter a password and record a voice greeting. (When recording that greeting, it's not a bad idea to be somewhere quiet with good phone reception so that your greeting is as clear as possible.)
If you don't care to record a greeting, tap Voicemail → Greeting and then tap the Default button. Callers will hear a canned greeting put together by your carrier.Note:
To create a greeting at another time, just tap the Greeting button at the top of the Voicemail screen and then tap Custom. Tap Record; say your piece; then tap Done. Tap Play to listen to what you have recorded, and if you like it, tap Save. - Locate a message you want to hear
Messages are named for the person who called (if known). The time (or date, if the call was made on a different day) appears next to the caller's name. A blue arrow icon appears next to each name, even if that name is Unknown; tap that icon to be taken to a contact Info screen. A blue dot marks each unheard message. - Select the message you want to listen to, and tap the Play button on
the left side of the message entry.
The Play button changes to Pause while the iPhone downloads the message and then plays it (Figure below).
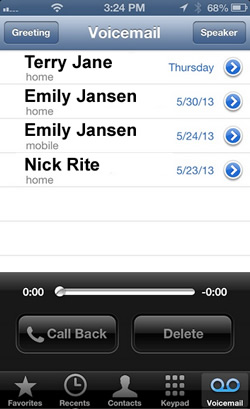
To pause a playing message, tap the Pause button (the two vertical lines) to the left of the caller's name. Tap the Play symbol (the rightpointing triangle) to resume playing the message.
When you begin playing a message, a new sheet appears, displaying a scrubber bar and Call Back and Delete buttons. To move through a message quickly-if your father tends to go on and on about this season's gopher issues before getting to the meat of the message, for example-drag the playhead to a later point in the message. If the phone was able to obtain a number through Caller ID, you have the option to call that person back immediately by tapping Call Back.
To listen to a message again, simply select it again and tap the Play button. If listening once was enough, tap Delete.Note:
Deleted messages aren't completely gone. At the end of your voicemail list, you'll see a Deleted Messages entry. Tap this entry and then tap the message you'd like to listen to again. You can undelete a message by tapping it in the Deleted Messages screen and then tapping Undelete. - (Optional) Create a contact
If someone who isn't in your list of contacts calls, and you'd like to add her to that list, tap the blue arrow icon next to the message heading. In the sheet that appears, tap either Create New Contact (if this contact is new to you) or Add to Existing Contact (if the caller is already a contact, but you don't have this particular number). Then choose a contact to add the number to.
If you've created a contact for a caller, you can also add her to your Favorites list, which describe in greater detail later in this article. Just tap the blue arrow icon and then tap Add to Favorites. - (Also optional) Listen later
The iPhone lets you know if you have voice-mail messages waiting. If you've missed one or more calls, received one or more voice-mail messages, or both, a red circle appears in the top-right corner of the Phone application's icon on the Home screen. A number inside the circle denotes the combined number of missed calls and unheard messages. When you tap the Phone icon, a similar red circle appears over the Voicemail icon, indicating how many unheard messages you have.
Recents
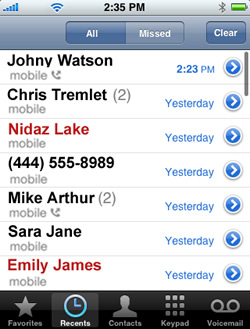
Like other modern mobile phones, the iPhone keeps track of calls you've made and received-both those you've participated in and those you've missed. You'll find a list of those most recent calls by tapping the Recents button at the bottom of the Phone screen.
In the Recents screen, you may see any (or all) of the following:
- Names, if the callers or recipients are in your phone's list of contacts If a name appears, you'll also see the kind of number the call came from (mobile, home, work, or FaceTime, for example).
- Phone numbers, if the callers or recipients aren't in the phone's list of contacts and the numbers aren't blocked
For a number, you also see the location of the number (such as Anytown, AK). - The word blocked, if a phone number is blocked
Contacts that you've attempted to reach multiple times have a number next to them-Mikey Arthur (3) or 444-8987 (3), for example-indicating the number of calls made.
To see all calls, tap the All button at the top of the screen (Figure below). Missed calls are shown in red. To see just your missed calls, tap the Missed button at the top of the screen. As in Voicemail, you see the time or day when the call was made. Tap the blue arrow icon to be taken to one of a few screens, depending on what your iPhone "knows" about the phone number for each call you've placed or received.
If a number belongs to someone listed in your contacts, tapping the blue arrow icon takes you to a screen that displays that person's contact info. Additionally, you see the kind of call (outgoing or incoming), the time and date of the call, and the length of the call. (This entry reads Cancelled if the call didn't go through.) At the bottom of that screen are icons marked Send Message, Share Contact, FaceTime, and Add to Favorites.
You use them as follows:
- Send Message:
Tap Send Message to launch the Messages app and open a blank text message directed to that person. (If the person has more than one phone number or email account in her contact info, a sheet appears and asks you to choose the number to use.) - Share Contact:
When you tap Share Contact, a sheet rolls up to offer you three options: Email, Message, and Cancel. When you tap Email, a new, unaddressed email message opens, containing that person's contact information saved as a vCard attachment. (vCard is a universal format for exchanging contact information between devices.) To send that message, just enter a recipient in the To field and type something in the Subject field. Tap Message, and a new message opens in the Messages application, containing the vCard as part of that message, or tap Cancel to do the obvious. - FaceTime:
Tap FaceTime, and your iPhone attempts to make a FaceTime video call. (For details, see "Getting a Little FaceTime" later in this article.) - Add to Favorites:
Tap Add to Favorites, and that's just what happens: The person is added to your list of favorites, and you can access his info by tapping Favorites at the bottom of the screen.
If you place a call to a number that isn't in the iPhone's list of contacts, or if you capture an unrecognized Caller ID number from a received call, the phone number is displayed, and you can tap the blue arrow icon to view these options: Call, Message, Create New Contact, Add to Existing Contact, and Share Contact.
If the number came from a blocked number, the entry reads Blocked Caller, and tapping the icon tells you only the date and time when the person called.
Tap Clear to clear the Recents lists.
Favorites
Use the Favorites list to store those very special contacts you call routinely (Figure below).

Just like those in Recents and Voicemail, each entry in the Favorites list bears a small blue arrow icon. Tap it to view that person's Info screen.
Here, you'll find the numbers you've added by tapping the Add to Favorites button in a contact's Info screen or by tapping Favorites, tapping the plus (+) icon, and then navigating through your list of contacts to find a name. You can add only contacts that have an associated phone number (for calling) or email address (for FaceTime).
Contacts
Last but hardly least is Contacts. Because your friends, relatives, and associates are the worthiest people on Earth, they deserve their own section, which comes up right away.