
Working in the Word Environment
As with all programs in the 2007 Microsoft Office release, the most common way to start Word is from the Start menu displayed when you click the Start button at the left end of the Microsoft Windows taskbar. If Word is the first program in the 2007 Office system that you have used, you are in for a surprise! The look of the program window has changed radically from previous versions.
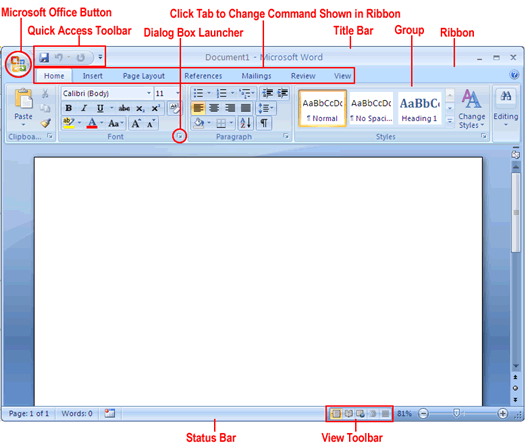
The new Word environment is designed to more closely reflect the way people generally work with the program. When you first start Word, this environment consists of the following elements:
- Commands related to managing Word and Word documents as a whole (rather than document content) are gathered together on a menu that is displayed when you click the Microsoft Office Button.
- Commands can be represented as buttons on the Quick Access Toolbar to the right of the Microsoft Office Button. By default, this toolbar displays the Save, Undo, and Repeat buttons, but you can customize the toolbar to include any command that you use frequently.
- The title bar displays the name of the active document. At the right end of the title bar are the three familiar buttons that have the same function in all Windows programs. You can temporarily hide the Word window by clicking the Minimize button, adjust the size of the window with the Restore Down/Maximize button, and close the active document or quit Word with the Close button.
- Below the title bar is the Ribbon, which makes all the capabilities of Word available in a single area so that you can work efficiently with the program.
- Commands related to working with document content are represented as buttons on the tabs that make up the Ribbon. The Home
tab is active by default. Clicking one of the other tabs, such as Insert, displays that tab's buttons.
If Microsoft Outlook with Business Contact Manager is installed on your computer, you will have a Business Tools tab in addition to those shown in our graphics. - On each tab, buttons are organized into groups. Depending on the size of the program window, in some groups the button you
are likely to use most often is bigger than the rest.
Depending on your screen resolution and the size of the program window, a tab might not have enough room to display all of its groups. In that case, the name of the group resembles a button, and clicking the button displays the group's commands. - Related but less common commands are not represented as buttons in the group. Instead they are available in a dialog box, which you can display by clicking the Dialog Box Launcher at the right end of the group's title bar.
- Some button names are displayed and some aren't. Pausing the mouse pointer over any button for a few seconds (called hovering) displays a ScreenTip with not only the button's name but also its function.
- Some buttons have arrows, but not all arrows are alike. If you point to a button and both the button and its arrow are in the same box and are the same color, clicking the button will display options for refining the action of the button. If you point to a button and the button is in one box and its arrow is in a different box with a different shade, clicking the button will carry out that action with the button's current settings. If you want to change those settings, you need to click the arrow to see the available options.
- The Microsoft Office Word Help button appears at the right end of the Ribbon.
- You create a document in the document window. When more than one document is open, each document has its own window.
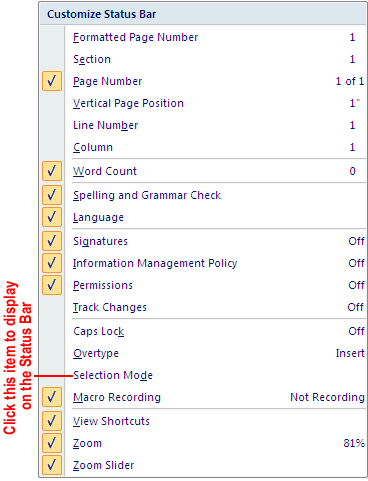
- Across the bottom of the program window, the status bar gives you information about the current document. You can turn off
the display of an item of information by right-clicking the status bar and then clicking that item.
- At the right end of the status bar is the View toolbar, which provides tools for adjusting the view of document content.
Now you will start Word and explore the Microsoft Office Button and the tabs and groups on the Ribbon. Along the way, you will see how to take advantage of galleries and live preview. There are no practice files for this tutorial. Be sure to start your computer, but don't start Word yet.
- On the taskbar, click the Start button, click All Programs, click Microsoft Office, and then click Microsoft Office Word 2007.
The Word program window opens, displaying a blank document. - Click the Microsoft Office Button.
Commands related to managing documents (such as creating, saving, and printing) are available from the menu that opens. This Office menu, takes the place of the File menu that appeared in previous versions of Word.
The commands on the left are for tasks related to the document as a whole. After you have worked with a document, its name appears in the Recent Documents list so that you can quickly open it again. At the bottom of the menu are buttons for changing program options and for quitting Word. - Press the Escape key to close the menu.
On the Ribbon, the Home tab is active. Buttons related to working with document content are organized on this tab in five groups: Clipboard, Font, Paragraph, Styles, and Editing. Only the buttons representing commands that can be performed on the currently selected document element are active. - Hover the mouse pointer over the active buttons on this tab to display the ScreenTips that name them and describe their functions.
Depending on your screen resolution and the size of the program window, you might see more or fewer buttons in each of the groups, or the buttons you see might be represented by larger or smaller icons. Experiment with the size of the program window to understand the effect on the appearance of the tabs. - Click the Insert tab, and then explore its buttons.
Buttons related to all the items you can insert are organized on this tab in seven groups: Pages, Tables, Illustrations, Links, Header and Footer, Text, and Symbols. - Click the Page Layout tab, and then explore its buttons.
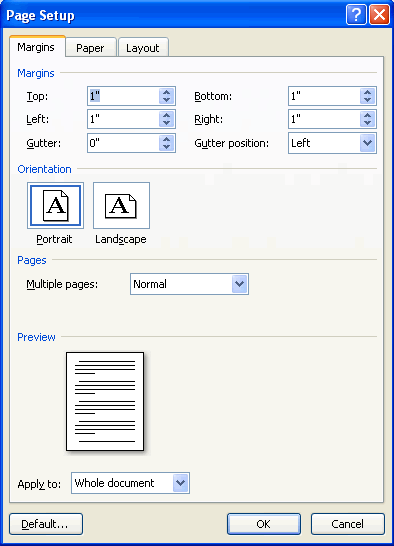
Buttons related to the appearance of your document are organized on this tab in five groups: Themes, Page Setup, Page Background, Paragraph, and Arrange. - In the Page Setup group, display the ScreenTip for the Margins button. The ScreenTip tells you how you can adjust the margins.
- At the right end of the Page Setup group's title bar, click the Page Setup Dialog Box Launcher. The Page Setup dialog box opens.
The dialog box provides a single location where you can set the margins and orientation, and specify the setup of a multi-page document. You can preview the results of your changes before applying them.
- Click Cancel to close the dialog box then In the Themes group, click the Themes button. You see a gallery of thumbnails
of the available themes.
Press Escape to close the gallery without making a selection. - In the Page Background group, click the Page Color button, and then in the top row of the Theme Colors palette, point to
each box in turn.
The blank document page shows a live preview of what it will look like if you click the color you are pointing to. You can see the effect of the selection without actually applying it. Press Escape to close the palette without making a selection. - Click the References tab, and then explore its buttons.
Buttons related to items you can add to long documents, such as reports, are organized on this tab in six groups: Table Of Contents, Footnotes, Citations & Bibliography, Captions, Index, and Table Of Authorities. - Click the Mailings tab, and then explore its buttons.
Buttons related to creating mass mailings are organized on this tab in five groups: Create, Start Mail Merge, Write & Insert Fields, Preview Results, and Finish. - Click the Review tab, and then explore its buttons.
Buttons related to proofing, commenting, and changing documents are organized on this tab in six groups: Proofing, Comments, Tracking, Changes, Compare, and Protect. - Click the View tab, and then explore its buttons.
Buttons related to changing the view or the display of documents are organized on this tab in five groups: Document Views, Show/Hide, Zoom, Window, and Macros.
In this tutorial:
- Exploring Word 2007
- Working in the Word Environment
- Opening, Moving Around in, and Closing a Document
- Displaying Different Views of a Document
- Zooming Page or Text
- The Window Group: Doing the Splits
- Creating and Saving a Document
- Understanding Word File Types
- Previewing and Printing a Document
- Word Key Tips