Protect Worksheets
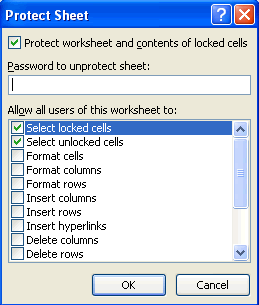
- Click the area on the sheet that you want to protect and then choose Review> Changes> Protect Sheet. The Protect Sheet
dialog box appears.

- Make sure the option Protect Worksheet and Contents of Locked Cells is checked. Optionally, in the Password to Unprotect Sheet text box, type a password. For privacy reasons, only a series of dots appears.
- From the Allow All Users of the Worksheet To box, select any options a user is allowed to change without unprotecting
the worksheet and click ok.
Deselecting the Select Locked Cells option does not allow an unauthorized user to even click a locked cell. All cells are considered locked unless you unlock them. - If you generated a password, a Confirm Password dialog box appears. Retype the password and then click OK again.
- In the protected worksheet, attempt to change the value in a locked cell. Excel displays the error message.
- To unprotect the worksheet, choose Review> Changes> Unprotect Sheet and enter the password if prompted.
When the worksheet is protected and the Select Unlocked Cells option is set, pressing Tab moves to the next unlocked cell, making data entry much easier.
Sheet protection options
The Protect Sheet dialog box has several options, which determine what the user can do when the worksheet is protected.
Select locked cells:
If checked, the user can select locked cells using the mouse or the keyboard. This setting is checked, by default.
Select unlocked cells:
If checked, the user can select unlocked cells using the mouse or the keyboard. This setting is checked, by default.
Format cells:
If checked, the user can apply formatting to locked cells.
Format columns:
If checked, the user can hide or change the width of columns.
Format rows:
If checked, the user can hide or change the height of rows.
Insert columns:
If checked, the user can insert new columns.
Insert rows:
If checked, the user can insert new rows.
Insert hyperlinks:
If checked, the user can insert hyperlinks (even in locked cells).
Delete columns:
If checked, the user can delete columns.
Delete rows:
If checked, the user can delete rows.
Sort:
If checked, the user can sort data in a range (as long as the range doesn't contain any locked cells).
Use AutoFilter:
If checked, the user can use existing autofiltering.
Use PivotTable reports:
If checked, the user can change the layout of pivot tables or create new pivot tables.
Edit objects:
If checked, the user can make changes to objects (such as Shapes) and charts, as well as insert or delete comments.
Edit scenarios:
If checked, the user can use scenarios.
In this tutorial:
- Protecting Excel Data
- Quickly Hide an Open Workbook
- Make a File Read-Only
- Mark a Workbook as Final
- Inspecting a Workbook
- Hide and Unhide Columns and Rows
- Excel Unlock Cells
- Protect Worksheets
- Excel Restrict User Data Entry
- Excel Assign a File Password
- Excel Hide Cell Formulas
- Protecting a workbook's structure
- Using a digital signature in Excel
- Signing a Workbook
