
Shortcut Commands Worth Knowing
Shortcut commands that can save time as you construct PowerPoint presentations. These commands belong in the Hall of Fame. They are Undo, Repeat, and AutoCorrect.
Undoing a Mistake
Fortunately for you, all is not lost if you make a big blunder, because PowerPoint has a marvelous little tool called the Undo command. This command "remembers" the previous 20 editorial and formatting changes you made. As long as you catch your error in time, you can "undo" your mistake.
Click the Undo button on the Quick Access toolbar to undo your most recent change. If you made your error and went on to do something else before you caught it, open the drop-down list on the Undo button. It shows your previous 20 actions. Click the one you want to undo or, if it is not on the list, scroll until you find the error and then click it. However, if you do this, you also undo all the (more recent) actions on the Undo menu above the one you are undoing.
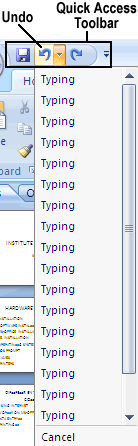
Fixing a mistake on the Undo drop-down list.
PowerPoint gives you the option of being able to undo more than 20 actions. Click the Office button and choose PowerPoint Options. In the PowerPoint Options dialog box, select the Advanced category. Then enter a number in the Maximum Number of Undos box. Being able to undo numerous actions is nice, of course, but it also taxes your computer's memory and can make your computer grumpy and sluggish.
Repeating an action - and quicker this time
The Quick Access toolbar menu offers a button called Repeat that you can click to repeat your last action. This button can be a mighty, mighty time saver. For example, if you just changed fonts in one heading and you want to change another heading in the same way, select the heading and click the Repeat button (or press F4 or Ctrl+Y). Move the pointer over the button to see what clicking the button will do. You can find many creative uses for the Repeat command if you use your imagination.
Entering Text Quickly with the AutoCorrect Command
To open the AutoCorrect dialog box, click the Office button, choose PowerPoint Options, select the Proofing category in the PowerPoint Options dialog box, and then click the AutoCorrect Options button. Select the AutoCorrect tab in the AutoCorrect dialog box.
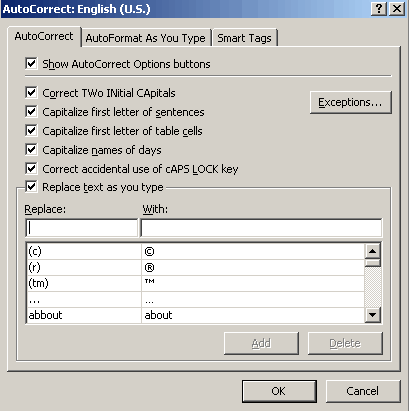
In the Replace column on the AutoCorrect tab are hundreds of common typing errors and codes that PowerPoint corrects automatically. The program corrects the errors by entering text in the With column whenever you mistakenly type the letters in the Replace column. However, you can also use this dialog box for a secondary purpose to quickly enter text.
To make AutoCorrect work as a means of entering text, you tell PowerPoint to enter the text whenever you type three or four specific characters. Follow these steps to use AutoCorrect to enter text:
- Open the AutoCorrect tab of the AutoCorrect dialog box.
- In the Replace text box, enter the three or four characters that will trigger the AutoCorrect mechanism and make it enter
your text.
Do not enter a word, or characters that you might really type someday, in the Replace box. If you do, the AutoCorrect mechanism might kick in when you least expect it. Enter three or four characters that never appear together. And start all AutoCorrect entries with a slash (/). You might forget which characters trigger the AutoText entry or decide to delete your AutoCorrect entry someday. By starting it with a slash, you can find it easily in the AutoCorrect dialog box at the top of the Replace list. - In the With text box, enter the hard-to-type name or word(s) that will appear when you enter the Replace text on a slide.
- Click the Add button and then click OK.
Test your AutoCorrect entry by typing the Replace text you entered in step 2 (which, of course, includes the slash we recommended) and pressing the spacebar (AutoCorrect does not do its work until you press the spacebar).
To delete an AutoCorrect entry, open the AutoCorrect dialog box, select the entry, and click the Delete button.