
Working with App Notifications
Lots of apps take advantage of an iOS feature called notifications, which enables them to send messages and other data to your iPhone. For example, the Facebook app displays an alert on your iPhone when a friend sends you a message. Similarly, the Foursquare app, which lets you track where your friends are located, sends you a message when a friend checks in at a particular location.
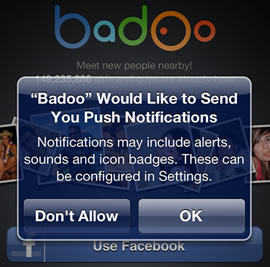
If an app supports notifications, then the first time you start it, your iPhone usually displays a message like the one shown in below, asking if you want to allow push notifications for the app. Tap OK if you are cool with that; if you are not, tap Don't Allow.
There are actually four kinds of push notifications:
- Sound: This is a sound effect that plays when some app-related event occurs.
- Alert: This is a message that pops up on your iPhone screen. You must then tap a button to dismiss the message before you can continue working with your current app.
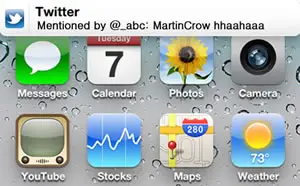
- Banner: This is a message that appears at the top of the screen, as shown in below. Unlike an alert, a banner allows you to keep using your
current app and disappears automatically after a few seconds. If you prefer to switch to the app to view the message, tap the banner.
- Badge: This is a small, red icon that appears in the upper-right corner of an app icon. The icon usually displays a number, which might be the number of messages you have waiting for you on the server.
Displaying the Notification Center
If you miss an alert or banner, or if you see a banner but ignore it, you can still eyeball your recent notification messages by displaying the Notification Center. This is a feature that combines all your recent alerts and banners in one handy location. So, not only can you see the most recent alert (as you could in previous versions of iOS), but you can also see the last few so you don't miss anything.
Even better, displaying the Notification Center is a snap "just swipe down from the top of the screen. The Notification Center displays your recent messages sorted by app. From here, you can either tap an item to switch to that app or tap elsewhere on the screen to hide the Notification Center.
Customizing notifications
For each app, your iPhone also lets you toggle individual notification types (sounds, alerts, and badges), switch between banner and alert messages, or remove an app from the Notification Center altogether. You can also configure app notifications to appear in the Lock screen. This is handy because you can see your notifications without having to unlock your iPhone.
Here is how to configure app notifications:
- On the Home screen, tap Settings. The Settings app appears.
- Tap Notifications. The Notifications screen appears.
- Tap the app you want to customize. The app notification settings appear. The settings for the Game Center app. Note that not all apps support all possible settings.
- To remove the app from the Notification Center, tap the Notification Center switch to Off.
- To set the maximum number of app messages that appear on the Notification Center, tap Show and then tap the number of messages.
- In the Alert Style section, tap the style you prefer for message notifications. Tap None to turn off alerts, or tap the style you want: Banners or Alerts.
- If the app supports badges, use the Badge App Icon switch to toggle this type of notification on or off.
- If the app supports sounds, use the Sounds switch to toggle this type of notification on or off.
- Use the View in Lock Screen switch to toggle whether the app's notifications appear in the iPhone Lock screen.
- Tap Notifications to return to the Notifications screen.
- Repeat Steps 3 to 10 to customize each app.
Configuring Do Not Disturb settings
The Notification Center is a truly useful tool that helps you see what is going on in your world at a glance and gives you a heads-up about activities, incoming messages, app happenings, and more. The Notification Center is a great innovation, but it is also a distracting one with its banners, alerts, and sounds. If you are in a meeting, at a movie, or going to sleep, you certainly don't want your iPhone disturbing the peace. Most people handle this by activating airplane mode, which turns off all the iPhone's antennas. That ensures you are distraction-free for a while, but it suffers from a major drawback: without any working antennas, your iPhone can't communicate with the world, so it does not download messages or perform any other online activities. That might be what you want, but it is less than optimum if you are expecting something important.
Note:
To turn on Do Not Disturb, tap Settings and then tap the Do Not Disturb switch to On.
iOS 6 solves this conundrum by offering Do No Disturb mode, which silences all iPhone distractions "including Notification Center alerts and phone calls" but keeps your iPhone online so that it can continue to receive data. That way, when you are ready to get back to the action, all your new data is already on your iPhone, so you can get back up to speed quickly.
You can get even more out of Do Not Disturb by configuring it to suit the way you work. Here are the steps to follow:
- Tap Settings to open the Settings app.
- Tap Notifications. The Notifications screen appears.
- Tap Do Not Disturb. The Do Not Disturb screen appears.
- To set a time to automatically activate and deactivate Do Not Disturb, tap the Scheduled switch to On, tap the From/To control, use From to set the start time, use To to set the end time, and then tap Do Not Disturb.
- If you want to allow certain calls even when Do Not Disturb is activated, tap Allow Calls From and then tap who you want to get through: Everyone, No One, Favorites (that is, anyone in the Phone app's Favorites list), or a particular contact group.
- If you want Do Not Disturb to allow a call through when the same person calls twice within 3 minutes, leave the Repeated Calls switch in the On position. If you don't want to allow this exception, tap the Repeated Calls switch to Off.
Tweeting or posting directly from the Notification Center
A bit later in this article I will show you how to sign in to your Facebook and Twitter accounts on your iPhone.