
Configure My iPhone
The iPhone is justly famous for its stylish, curvaceous design and its slick, effortless touchscreen. However, although good looks and ease of use are important for any smartphone, it is what you do with that phone that is important. The iPhone helps by offering lots of features, but chances are those features are not set up to suit the way you work. Maybe your most-used Home screen icons are not at the top of the screen where they should be, or perhaps your iPhone goes to sleep too soon. This article shows you how to configure your iPhone to solve these and many other annoyances so the phone works the way you do.
Customizing the Home Screen
The Home screen is your starting point for all things iPhone, and what could be simpler? Just tap the icon you want, and the app loads lickety-split. Ah, but things are never so simple, are they? In fact, there are a couple of hairs in the Home screen soup:
- The icons in the top row are a bit easier to find and a bit easier to tap.
- If you have more than 20 icons on the iPhone 5 (or 16 on earlier iPhones), they extend onto a second (or third or fourth) Home screen. If the app you want is not on the main Home screen, you must first flick to the screen that has the app's icon (or tap its dot) and then tap the icon.
- If your icons extend onto multiple Home screens, the four icons in the iPhone Dock appear on every Home screen, so they are always available.
You can make the Home screen more efficient by moving your four most-used icons to the iPhone Dock and by moving four other often-used icons to the top row of the main Home screen. You can do all this by rearranging the Home screen icons as follows:
- Display the Home screen.
- Tap and hold any Home screen icon. When you see the icons wiggling, release your finger.
- Tap and drag the icons into the positions you prefer. To move an icon to a previous screen, tap and drag it to the left edge of the current screen. To move it to a later screen, tap and drag it to the right edge of the current screen. Next, wait for the new screen to appear and then drop the icon where you want it.
- Rearrange the existing Dock icons by dragging them left or right to change the order.
- To replace a Dock icon, first tap and drag the icon off the Dock to create some space. Then tap and drag any Home screen icon into the Dock.
- Press the Home button. Your iPhone saves the new icon arrangement.
Note:
How do you end up with more than 20 icons? Easy: the App Store. This is an online retailer solely devoted to apps designed to work with iPhone technologies: multitouch, GPS, the accelerometer, wireless, and more. You can download apps via your cellular network or your Wi-Fi connection, so you can always get apps when you need them. We will discuss the App Store a bit later in this article.
The icons in the Home screen's menu bar are also fair game. That is, you can drag them left and right to change the order, and you can replace the menu bar icons with any other Home screen icons. For the latter, set the icons jiggling, and then tap and drag an icon off the menu bar to create some space. Now tap and drag any Home screen icon into the menu bar.
Creating an app folder
The best way to make the main Home screen more manageable is to reduce the total number of icons you have to work with. This is not a problem when you are just starting out with your iPhone, because out of the box it comes with only a limited number of apps. However, the addictive nature of the App Store almost always means that you end up with screen after screen of apps. In fact, the iPhone lets you use a maximum of 11 screens. If you fill each screen to the brim "that is 20 apps per screen on the iPhone 5" you end up with a total of 224 icons (including the four Dock icons; earlier iPhone versions can have up to 180 icons). That is a lot of icons.
Now, when reduce the number of icons on the Home screens, I don't mean that you should delete apps. Too drastic! Instead, you can take advantage of a great feature called app folders. Just like a folder on your hard drive that can store multiple files, an app folder can store multiple (up to 16) app icons. This enables you to group related apps together under a single icon, which not only reduces your overall Home screen clutter but can also make individual apps easier to find.
Here are the steps to follow to create and populate an app folder:
- Navigate to the Home screen that contains at least one of the apps you want to include in your folder.
- Tap and hold any icon until you see all the icons wiggling.
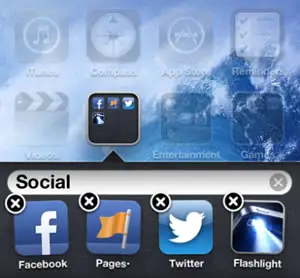
- Tap and drag an icon that you want to include in the folder, and drop it on another icon that you want to include in the same folder. Your iPhone creates the
folder and displays a text box so that you can name it. The default name is the underlying category used by the apps, as shown in below. If the apps are in different
categories, your iPhone uses the category of the app you dragged and dropped.
- Tap inside the text box to edit the name, if you feel like it, and tap Done when you finish.
- Press the Home button. Your iPhone saves your new icon arrangement.
Use the following techniques to work with your app folders:
- To add another app to the folder, tap and drag the app icon and drop it on the folder.
- To launch an app, tap the folder to open it and tap the app.
- To rename a folder or rearrange the apps within a folder, tap the folder to open it. Then tap and hold any app icon within the folder. You can then edit the folder name, or drag and drop the apps within the folder.
- To remove an app from a folder, tap the folder to open it. Tap and hold any app icon within the folder, then drag it out of the folder.
Adding a Safari web clip to the Home screen
Do you have a web page that you visit all the time? If so, you can set up that page as a bookmark in the iPhone Safari browser, but there is an even faster way to access it: add it to the Home screen as a web clip icon. A web clip is a link to a page that preserves that page's scroll position and zoom level. For example, suppose a page has a form at the bottom. To use that form, you have to navigate to the page, scroll to the bottom, and then zoom in to see it better. However, you can perform all three actions "navigate, scroll, and zoom" automatically with a web clip.
Follow these steps to save a page as a web clip icon on the Home screen:
- Use the Safari browser on your iPhone to navigate to the page you want to save.
- Scroll to the portion of the page you want to see.
- Pinch and spread your fingers over the area you want to zoom in on until you can comfortably read the text.
- Tap the Actions icon (the arrow) at the bottom of the screen. iPhone displays a list of actions.
- Add to Home Screen. iPhone prompts you to edit the web clip name.
- Edit the name as needed. Names up to about 10 to 14 characters display on the Home screen without being broken. The fewer uppercase letters you use, the longer the name can be. For longer names, iPhone displays the first and last few characters (depending on the locations of spaces in the name) separated by an ellipsis (...). For example, if the name is My Home Page, it appears in the Home screen as My Ho...Page.
- Tap Add. iPhone adds the web clip to the Home screen and displays the Home screen. If your main Home screen is already filled to the brim with icons, iPhone adds the web clip to the first screen that has space available.
To delete a web clip from the Home screen, tap and hold any Home screen icon until the icon dance begins. Each web clip icon displays an X in the upper-left corner. Tap the X of the web clip you want to remove. When iPhone asks you to confirm, tap Delete, and then press the Home button to save the configuration.
Resetting the default Home screen layout
If you make a bit of a mess of your Home screen, or if someone else is going to be using your iPhone, you can reset the Home screen icons to their default layout. Follow these steps:
- On the Home screen, tap Settings. The Settings app appears.
- Tap General. The General screen appears.
- Scroll down and tap Reset. The Reset screen appears.
- Tap Reset Home Screen Layout. iPhone warns you that the Home screen will be reset to the factory default layout.
- Tap Reset Home Screen. iPhone resets the Home screen to the default layout, but it does not delete the icons for any apps you have added.