Roaming Profiles
Local user profiles work great if a user logs on to the same system all the time. However, in some organizations users may frequently log on to different systems. Mapped network drives, shortcuts on the desktop, and other elements of the user's profile are often useful if they're available to a user no matter where the user logs on. Roaming profiles can be implemented to ensure the same profile is available to a user no matter which computer is used.
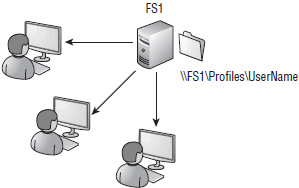
Figure below shows how roaming profiles are used. A folder is shared on a server that is available to the user on the network, and the user's account is then configured to use this share for the profile.
When the user logs on to a computer, the profile is retrieved from the network share and copied onto the local computer. If the user makes any changes, these changes are copied up to the roaming profile on the network share. If a user then moves to a different computer and logs on, the profile is copied down to the different computer.

Roaming profiles can be implemented only in a domain. The two steps used to create a roaming profile are as follows:
- Create a share on a server. This share needs to be accessible to users using the UNC path (\\ServerName\ShareName). If more than one user will use this share, the Authenticated Users group should be granted Full Control. It's not necessary to create the folder for each user because this can be created automatically.
- Modify the domain user account. The Profile tab of the user account Properties page includes a Profile Path text box. The UNC path to the share is added here and appended with the %UserName% variable, giving a full path of \\ServerName\ShareName\%UserName%. When the user logs on, a folder will be created within the share with the appropriate permissions for the user to access the folder.
In this tutorial:
- Managing Windows 7 in a Domain
- The Domain
- What is Wrong with Workgroups
- The Domain Concept
- Active Directory
- Domain Security
- Joining a Domain
- Windows 7 Offline Domain Join
- Browsing the Domain
- Searching the Domain
- Custom Searches
- Assigning Permissions to Domain Members
- The Double-Thick Security Trick
- Creating a Test Bed
- Creating a Domain
- Installing Windows Server 2008 on vPC
- Configuring a Windows Server 2008 Server
- Promoting a Server to a Domain Controller
- Joining Windows 7 to a Domain
- Authentication vs Authorization
- Authentication
- Authorization
- Built-in Groups
- Organizing Users with Groups
- Group Scope and Group Type
- Creating Users and Groups in a Domain
- Using HomeGroup with a Domain-Based Computer
- Identifying and Resolving Logon Issues
- Hardware vs. Network
- Using Cached Credentials
- Password Expiration
- Determining Logon Context
- Logon Hours Compliance
- Restricting Computer Access
- Time Synchronization
- Understanding User Profiles
- Standard Profiles
- Roaming Profiles
- Implementing Roaming Profiles
- Mandatory Profiles
- Super-Mandatory User Profiles
- Modifying the Default User Profile
- Configuring Settings with Scripts
- Anti-Malware Software
- Microsoft Windows 7 Defender
- Third-Party Anti-malware Software
