Moving the Cursor with the Mouse
When you move the mouse, Word turns the mouse pointer into an I-beam pointer. If you move the mouse over an area where you cannot type any text, the mouse pointer turns back into the traditional arrow, pointing up to the left.
To move the cursor with the mouse, just point and click the left mouse button once. The blinking cursor appears where you clicked the mouse.
If you have a blank page or a blank area at the end of your document, you can move the cursor anywhere within this blank area by following these steps:
- Move the mouse pointer over any blank area past the end of a document. Word defines the end of a document as the spot
where no more text appears. To find the end of a document, press Ctrl+End.
In a new document:
The end of the document is in the upper-left corner where the cursor appears.
In a document with existing text:
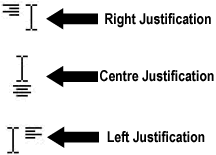
The end of the document is the last area where text appears (including spaces or tabs). - Move the mouse pointer over any blank area past the end of the document. Notice that a Left, Center, or Right Justification icon appears to the right or bottom of the I-beam mouse pointer.
- Make sure the correct justification icon appears next to the mouse pointer.
For example, if you want to center-justify your text, make sure the Center Justification icon appears at the bottom of the I-beam pointer.
Getting the Left, Center, or Right Justification icon to appear in Step 3 can be tricky. The Left Justification icon appears most of the time. To make the Center Justification icon appear, move the mouse pointer to the center of the page. To make the Right Justification icon appear, move the mouse pointer to the right edge of the page. - Double-click the mouse pointer. Word displays your cursor in the area you clicked. Any text you type now will appear justified
according to the justification icon display.

The justification icon appears next to the mouse pointer when you move the mouse pointer past the end of a document.
