
Camera: Shooting Pictures
When the first iPhones appeared in 2007, they came with a 2-megapixel camera that really wasn't all that good. The iPhone 3GS introduced a 3-megapixel autofocus camera, and the iPhone 4 upped the photographic ante with a 5-megapixel autofocus camera with LED flash. The lower-resolution cameras on the older iPhones have some limitations, since they work badly in low light and compress images to conserve storage space on the phone. For these phones, you'll want to make sure that you take photos in situations where there's a lot of light available. Even then, when you get your pictures back to your computer, take advantage of the numerous tutorials around the Internet that show you how to enhance cell phone images with photo editors such as Photoshop or GIMP.
The iPhone 4 camera is actually pretty good as cell phone cameras go. It still has about half the resolution of many inexpensive point-and-shoot digital cameras, but as the saying goes, "The best camera is the one that is always with you." Chances are very good that you'll have your iPhone in your pocket or purse for almost any occasion while that digital camera is sitting on the shelf at home.
The iPhone 3GS and 4 both have digital zoom capabilities built in. Digital zoom means that the camera essentially crops an image down to a centered area and then interpolates the result back up to the size of the original image. It's has the same effect as using a zoom lens to zoom in on details of a faraway item but is all accomplished digitally. Unfortunately, without special post-processing, digitally zoomed photos don't have the same quality as those taken with an optical zoom lens.
Getting Started
To launch your photo-capture software, tap Camera. As the camera starts up, the iPhone displays an animation of an iris opening before transferring you to a live display. Note that you can hold your iPhone in either portrait (vertical) or landscape (horizontal) orientation while taking photos. Frame your picture using this display, and then tap the Camera button to snap your picture.
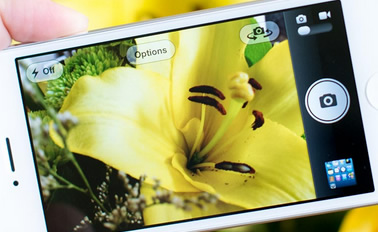
Tap the Camera button (the button that, not surprisingly, looks like a camera) to snap a new photo. Tap the Camera Roll button (bottom right, displaying the last photo in the camera roll) to switch to the Camera Roll in the Photos app. The Switch Cameras button (upper left) switches between the back- and front-facing cameras on the iPhone 4, the Flash button (lower left) is used to set the flash mode or turn the flash off, and the photo/video slider (upper right) is used to switch between still photos and video capture.
Continue snapping pictures as long as desired and as long as you have space available on your unit. The iPhone plays a cheerful snapshot noise each time it captures an image. When you're finished, tap the Home button to return to the Home screen, or tap the button at the Camera Roll button (lower right in Figure) to switch to the current Camera Roll. Your Camera Roll contains all the digital pictures you've snapped on your iPhone, just like a physical film roll in a nondigital camera.
Picture-Taking Pointers
Here are a few pointers for taking pictures with your iPhone camera:
- To zoom in or out on a subject, tap the screen. A zoom slider with a plus sign on one end and a minus sign on the other appears. To zoom in, slide the button on the slider from minus to plus. To zoom out, slide in the opposite direction.
- The iPhone is not set up for use with a tripod right out of the box. You'll achieve better photographic results when you steady your hand on a wall or shoulder, rather than just holding the camera out at arm's length. There are also adapters that hold the iPhone in a vertical or horizontal position and include a standard tripod screw mount. Google iPhone tripod mount for a number of commercially available and do-ityourself products.
- You can shoot your pictures in either landscape or portrait mode. The iPhone remembers the way each image was composed. Don't forget; you can also lock your iPhone orientation by double-clicking the Home button, swiping right, and then tapping the lock button.
- You can use selective focus to obtain sharp images with some depth of field. To do this, tap the screen in approximately the location of the item you want to focus on. A square appears on the image preview, flashes briefly as the camera focuses on the item you're pinpointing, and then disappears when the subject is in focus. This is particularly useful when taking macro close-up shots.
- How do you set the exposure on a picture? The selective focus also acts as a pinpoint exposure meter. The camera bases its exposure on the subject that you're focusing on. This is a handy thing to remember when you're taking portraits: focus on the face of your subject, and the face will always be properly exposed.
- The iPhone captures photos when your finger leaves the Camera button, not when you first touch the screen. To capture better images, touch your finger to the screen, frame your shot, and then snap the photo by removing your finger from the button. This gives you greater control and simplifies the trigger movement.
- While the cameras on the iPhone 3GS and 4 provide digital zoom, there's no way to take wide-angle or extreme telephoto pictures. You may want to consider something like the OWLE Bubo (http://www.wantowle.com), which is an aluminum casing that holds an iPhone 3GS or 4 and features a threaded mount for camera lenses and filters. It comes with .45x wide-angle/macro combination lens.