
Adapting the Quick Access toolbar
When you first start using Excel 2007, the Quick Access toolbar contains only the following few buttons:
- Save to save any changes made to the current workbook using the same filename, file format, and location.
- Undo to undo the last editing, formatting, or layout change you made.
- Redo to reapply the previous editing, formatting, or layout change that you just removed with the Undo button.
The Quick Access toolbar is very customizable as Excel makes it really easy to add any Ribbon command to it. Moreover, you are not restricted to adding buttons for just the commands on the Ribbon: you can add any Excel command you want to the toolbar, even the obscure ones that don't rate an appearance on any of its tabs.
By default, the Quick Access toolbar appears above the Ribbon tabs immediately to the right of the Office Button. To display the toolbar beneath the Ribbon immediately above the Formula bar, click the Customize Quick Access Toolbar button (the drop-down button to the right of the toolbar with a horizontal bar above a down-pointing triangle) and then click Show Below the Ribbon on its drop-down menu. You will definitely want to make this change if you start adding more buttons to the toolbar so that the growing Quick Access toolbar does not start crowding out the name of the current workbook that appears to the toolbar's right.
Adding command buttons on the Customize Quick Access Toolbar's drop-down menu
When you click the Customize Quick Access Toolbar button, a drop-down menu appears containing the following commands:
- New
to open a new workbook - Open
to display the Open dialog box for opening an existing workbook - Save
to save changes to your current workbook - E-mail
to open your mail - Quick Print
to send the current worksheet to your default printer - Print Preview
to open the current worksheet in the Print Preview window - Spelling
to check the current worksheet for spelling errors - Undo
to undo your latest worksheet edit - Redo
to reapply the last edit that you removed with Undo - Sort Ascending
to sort the current cell selection or column in A to Z alphabetical, lowest to highest numerical, or oldest to newest date order - Sort Descending
to sort the current cell selection or column Z to A alphabetical, highest to lowest numerical, or newest to oldest date order
When you first open this menu, only the Save, Undo, and Redo options are selected (indicated by the check marks in front of their names) and therefore theirs are the only buttons to appear on the Quick Access toolbar. To add any of the other commands on this menu to the toolbar, you simply click the option on the drop-down menu. Excel then adds a button for that command to the end of the Quick Access toolbar (and a check mark to its option on the drop-down menu).
To remove a command button that you add to the Quick Access toolbar in this manner, click the option a second time on the Customize Quick Access Toolbar button's drop-down menu. Excel removes its command button from the toolbar and the check mark from its option on the drop-down menu.
Adding command buttons on the Ribbon
To add any Ribbon command to the Quick Access toolbar, simply right-click its command button on the Ribbon and then click Add to Quick Access Toolbar on its shortcut menu. Excel then immediately adds the command button to the very end of the Quick Access toolbar, immediately in front of the Customize Quick Access Toolbar button.
If you want to move the command button to a new location on the Quick Access toolbar or group with other buttons on the toolbar, you need to click the Customize Quick Access Toolbar button and then click the More Commands option near the bottom of its drop-down menu.
Excel then opens the Excel Options dialog box with the Customize tab selected (similar to the one shown below). Here, Excel shows all the buttons currently added to the Quick Access toolbar with the order in which they appear from left to right on the toolbar corresponding to their top-down order in the list box on the right-hand side of the dialog box.
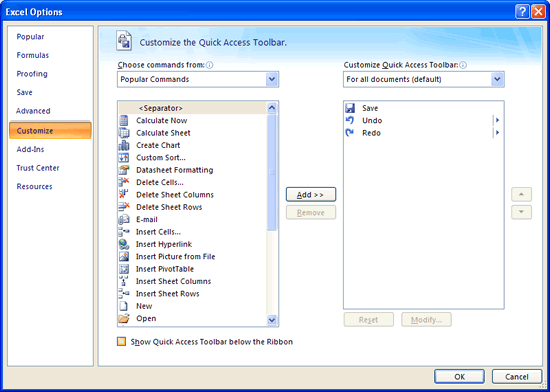
To reposition a particular button on the bar, click it in the list box on the right and then click either the Move Up button (the one with the black triangle pointing upward) or the Move Down button (the one with the black triangle pointing downward) until the button is promoted or demoted to the desired position on the toolbar.
You can add separators to the toolbar to group related buttons. To do this, click the <Separator> selection in the list box on the left and then click the Add button twice to add two. Then, click the Move Up or Move Down buttons to position one of the two separators at the beginning of the group and the other at the end.
To remove a button added from the Ribbon, right-click it on the Quick Access toolbar and then click the Remove from Quick Access Toolbar option on its shortcut menu.
Adding non-Ribbon commands to the Quick Access toolbar
You can also use the options on the Customize tab of the Excel Options dialog box to add a button for any Excel command even if it is is not one of those displayed on the tabs of the Ribbon:
- Click the type of command you want to add to the Quick Access toolbar
in the Choose Commands From drop-down list box.
The types of commands include the File pull-down menu (the default) as well as each of the tabs that appear on the Ribbon. To display only the commands that are not displayed on the Ribbon, click Commands Not in the Ribbon near the bottom of the drop-down list. To display a complete list of all the Excel commands, click All Commands at the very bottom of the drop-down list. - Click the command whose button you want to add to the Quick Access toolbar in the list box on the left.
- Click the Add button to add the command button to the bottom of the list box on the right.
- (Optional) To reposition the newly added command button so that it is
not the last one on the toolbar, click the Move Up button until it's in the desired position.
- Click the OK button to close Excel Options dialog box.