
Adding, configuring, and Removing Hardware Devices
Since its introduction in Windows 95, Plug and Play technology has evolved tremendously. Early incarnations of this technology were notoriously unreliable, leading some users to dismiss the feature as "plug and pray." As this now-mature technology enters its third decade, however, hardware and software standards have converged to make most device configuration tasks completely automatic.
Any computer that was certified as compatible with Windows 7 or later supports the Plug and Play device standard, which handles virtually all the work of configuring computer hardware and attached devices. A Plug and Play device identifies itself to Windows by using unique identifiers in a well-organized hierarchy, listing its required resources (including drivers), and allowing software to configure it.
Plug and Play devices can interact with the operating system, with both sides of the conversation responding to device notification and power management events. A Plug and Play driver can load automatically when Windows detects that a device has been plugged in, and it can suspend and resume operation properly along with the system.
Note
Although it's still possible to find older devices that require non-Plug and Play inputs, such as scanners, plotters, and similar peripherals that connect to serial and parallel ports, these legacy devices are becoming increasingly rare. If you own this type of device, we recommend retiring it if possible and replacing it with a supported modern alternative. If you have no choice but to keep it around, look for a community of fellow owners of that device; they're the most likely to be able to help you with configuration issues.
Installing a new Plug and Play device
When you install a Plug and Play device for the first time, Windows reads the Plug and Play identification tag in the hardware's BIOS or firmware. It then compares that ID tag with a master list of corresponding tags drawn from all the Setup Information files in the %SystemRoot%\Inf folder. If it finds a signed driver with a matching tag, it installs the correct driver file (or files) and makes other necessary system modifications with no intervention required from you. If everything goes as expected, the only subtle indication you might see is a progress dialog box (typically minimized) that displays a green bar over its taskbar icon and then vanishes when its work is complete.
Note
Any user can plug in a new device and begin using it if a driver for that device is included with Windows 10 or is available via Windows Update. Installing a new driver that is downloaded from a third-party site and is digitally signed by a third party rather than by Microsoft requires an administrator's credentials.
If Windows detects a Plug and Play device (after you've plugged it into a USB port, for instance) but cannot locate a digitally signed driver that matches the device, it doesn't provide any warning notification. Instead, a stub for the device is installed as it awaits the arrival of a proper driver. These partially installed devices appear in Device Manager, under the Other Devices heading, with a yellow exclamation point over the device name.
Troubleshooting: Drivers for built-in devices are missing
Device Manager might show some devices in the Other Devices category, with a yellow exclamation point indicating that the correct drivers are missing, after a clean installation of Windows 10. This usually occurs on a PC where some low-level devices built into the motherboard aren't recognized during Windows 10 setup. The usual cure for this sort of problem is to check with the device manufacturer to see whether drivers are available for download; pay special attention to chipset drivers, which add the necessary entries to the Windows Plug and Play database to allow the correct built-in drivers to be installed.
When Windows Update can't find a signed driver (and, thankfully, those occasions are becoming rarer as the Windows ecosystem matures), you need to manually install a device driver.
The built-in Windows drivers are perfectly adequate for many device classes. Some devices, especially complex ones like scanners and all-in-one printers, might require utility software and additional drivers to enable the full range of features for that device.
How device drivers and hardware work together
Before Windows can work with any piece of hardware, it requires a compatible, properly configured device driver. Drivers are compact control programs that hook directly into Windows and handle the essential tasks of communicating your instructions to a hardware device and then relaying data back to you. After you set up a hardware device, its driver loads automatically and runs as part of the operating system, without requiring any further intervention on your part.
Many of the individual technologies used in Windows 10 devices use minidriver models, where the device driver is made up of two parts. Typically, Microsoft writes a general class driver that handles tasks that are common to devices in that category. The device manufacturer can then write device-specific code to enable custom features.
Windows 10, even more than its recent predecessors, includes a surprisingly comprehensive library of class drivers that allow most devices to function properly without requiring any additional software. There are class drivers for pieces of hardware that are, these days, typically integrated into a larger system: audio devices, network adapters, webcams, and display adapters, for example. Windows 10 also includes drivers for external add-ons (wired and wireless) including printers, monitors, keyboards, scanners, mice and other pointing devices, smartphones, and removable storage devices.
This core library is copied during Windows setup to a protected system folder, %SystemRoot%\System32\DriverStore. (Driver files and associated elements are stored in the FileRepository subfolder.) Anyone who signs in to the computer can read and execute files from this location, but only an installation program working with authorization from a member of the Administrators group can create or modify files and folders there.
You can add new drivers to the driver store in a variety of ways, including the following:
- Windows Update offers drivers when it detects that you're running a device that is compatible with that driver but is currently using an older version. (You can also search for the most recent driver via Windows Update when installing a new device.)
- A Windows cumulative update may refresh the driver store with new and updated drivers.
- As an administrator, you can add signed third-party drivers to the driver store by running an installer program. All drivers added to the driver store in this fashion are saved in their own subfolder within the FileRepository folder, along with some supporting files created by Windows 10 that allow the drivers to be reinstalled if necessary.
Any driver that has been added to the store is considered to be trusted and can be installed without prompts or administrator credentials. All drivers, new or updated, that are copied here from Microsoft servers are certified to be fully compatible with Windows 10 and are digitally signed by Microsoft.
Copy the FileRepository folder before a clean reinstall
If you're planning a clean reinstall of Windows 10 using bootable installation media rather than the Reset function, consider copying the FileRepository folder from %SystemRoot%\System32\DriverStore to removable media, such as a USB flash drive. After your clean install is complete, you can quickly reinstall any custom drivers by using the Update Driver option from Device Manager and specifying that saved folder as the location for the new driver files.
A Windows hardware driver package must include a Setup Information file (with the extension .inf). This is a text file that contains detailed information about the device to be installed, including the names of its driver files, the locations where they are to be installed, any required registry settings, and version information. All devices with drivers in the DriverStore folder include Setup Information files in the %SystemRoot%\Inf folder.
Although the Setup Information file is a crucial part of the driver installation process, you don't work with it directly. Instead, this file supplies instructions that the operating system uses during Plug and Play detection, when you use a setup program to install a device, or when you manually install a driver update.
Caution
The syntax of Setup Information files is complex, and the intricacies of .inf files can trip up even experienced software developers. If you find that a driver setup routine isn't working properly, you might be tempted to try editing the Setup Information file to work around the hang-up. Trust us: that approach is almost certain to fail. In fact, by tinkering with .inf files to install a driver that is not certified to be compatible with your hardware, you run the risk of corrupting registry settings and making your system unstable.
When Windows completes the installation of a driver package, it performs all the tasks specified by the Setup Information file and copies the driver files themselves to %SystemRoot%\System32\Drivers.
For Windows 10, signed drivers only
Beginning with the release of Windows 10, all new kernel-mode drivers must be submitted to Microsoft and digitally signed by the Windows Hardware Developer Center Dashboard portal. (Kernel-mode drivers run at the same level of privilege as Windows itself, as opposed to user-mode drivers, which run in the context of the currently signed-in user and cannot cause the system to crash.) Additionally, beginning 90 days after the release of Windows 10, any new drivers submitted to Microsoft must be signed by a valid Extended Validation Code Signing Certificate-a higher-cost option that provides extra assurance about the identity of a software publisher.
The net effect of these changes is to make it extremely difficult for malware to be delivered as part of a driver update. Drivers that were properly signed under the previous rules and were released before those two Windows 10 milestones will continue to work, but Windows 10 will not load new kernel-mode drivers unless they are signed by that Microsoft-controlled portal.
Driver signing establishes an initial threshold of trust, but by itself it's not necessarily an indicator of quality. For that you need to look at the signature a little more closely.
The highest level of quality is found with drivers that have passed compatibility and reliability tests for that category of device, as defined in Microsoft's Hardware Lab Kit. Those devices earn the right to use the Windows logo and can be included on Microsoft's Certified Products List.
Hardware developers who simply want to deliver a signed driver to their customers can submit the driver to Microsoft and "attest" to its quality rather than submitting actual test results. The Attested Signing Service signature is different from the one for a logocertified device, but Windows 10 treats them the same, allowing either type of signed driver to be installed with no prompts by any user.
In the distant past, users could change default settings to allow installation of unsigned drivers and even completely eliminate warnings about the accompanying security risks. Those options are available by changing advanced startup settings in Windows 10, but they require disabling Secure Boot and fundamentally undermine the device's security. As a result, we strongly recommend against using them.
Getting useful information from Device Manager
The more you know about individual hardware devices and their associated driver versions, the more likely you are to make short work of troubleshooting problems or configuring advanced features for a device. In every case, your starting point is Device Manager, a graphical utility that provides detailed information about all installed hardware, along with controls that you can use to configure devices, assign resources, and set advanced options.
Note:
In Windows 10, Device Manager also includes categories that don't represent actual hardware-print queues, for example, or anything under the Software Devices heading. In this section, we focus only on physical hardware devices and their associated drivers.
To open Device Manager (Devmgmt.msc), type device in the search box and then click its entry from the top of the results list. Power users can click the Device Manager shortcut on the Quick Access menu that appears when you right-click the Start button or press Windows key+X. (Device Manager is also available as a snap-in under the System Tools heading in the fully stocked Computer Management console.)
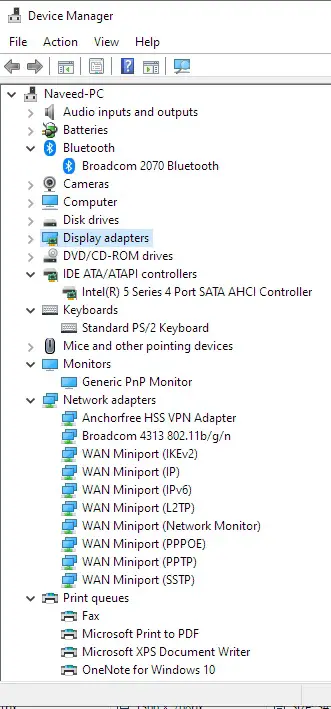
As Figure below shows, Device Manager is organized as a hierarchical list that inventories every piece of hardware within or connected to your computer. The default view shows devices by type.
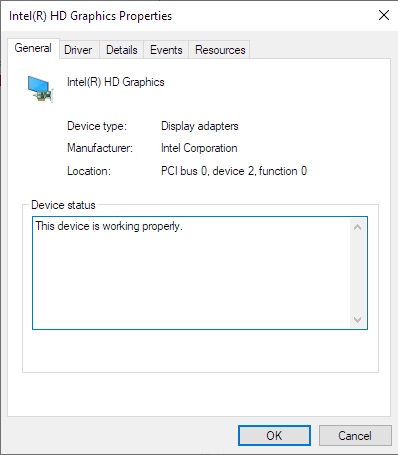
To view information about a specific device, double-click its entry in Device Manager's list of installed devices. Each device has its own multitabbed properties dialog box. Most hardware devices include a selection of tabs, including General and Driver. The General tab lists basic facts about the device, including the device name and type, the name of its manufacturer, and its current status, as in the example in Figure below.
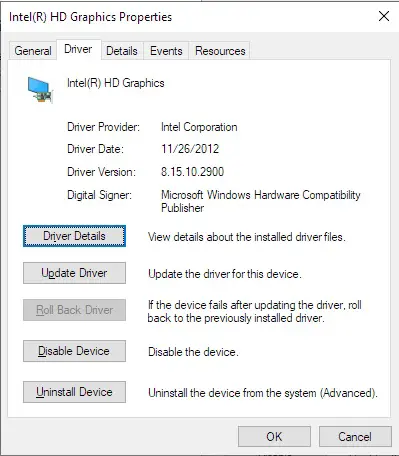
The Driver tab, shown, lists version information about the currently installed driver for the selected device. Although the information shown here is sparse, it covers the essentials. You can tell at a glance who supplied the driver and you can see who digitally signed it; you can also determine the date and version number of the driver, which is important when considering whether you should download and install an available update.
Clicking the Driver Details button on the Driver tab leads to another dialog box that lists the names and locations of all files associated with that device and its drivers. Selecting any file name from this list displays details for that file in the lower portion of the dialog box.
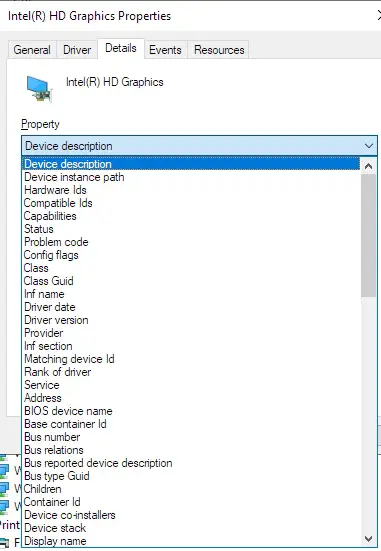
Click the Details tab for a potentially overwhelming amount of additional information, arranged in a dialog box that allows you to see one property and its associated value at a time. You can see the full list of properties by clicking the arrow to the right of the current entry in the Property box; Figure shows the typically dense result.
Choosing a property tucks the list away and displays the value associated with that property, as in the example shown here, which lists the Plug and Play IDs associated with the selected device.
Device Manager shows an unknown device
Most modern hardware built for Windows 7 or later just works with Windows 10. But occasionally you might find mysterious entries under the Other Devices heading in Device Manager, with few or no details, no associated drivers, and no clue about what to do next. This problem is most likely to appear after you perform a clean install of Windows 10 on a device originally designed for another operating system, but it's also possible for the issue to occur with older external hardware.
You can often get important clues by opening the properties dialog box for the device and looking on the Details tab. The Hardware IDs property, in particular, can be invaluable. The string VID_ followed by a number is a Vendor ID code; PID_ is a Product ID code. Use your favorite search engine to look on the web for a combination of those two values. For best results, limit the scope of your search to site:catalog.update.microsoft.com.
In addition to this basic information, the properties dialog box for a given device can include any number of custom tabs. The USB hub built into the motherboard of the PC, for example, adds a custom tab (Power) that allows you to view how much power is available for devices connected to ports on a particular USB hub (although it might take some further sleuthing and some trial and error to figure out which of the PC's physical ports are associated with that hub).
By design, the information displayed in Device Manager is dynamic. When you add, remove, or reconfigure a device, the information stored here changes as well.
Enabling and disabling devices
Any device listed in Device Manager can be disabled temporarily. You might choose this option if you're certain you won't need an installed device under normal conditions but you want to keep it available just in case. On a desktop PC with a permanent wired Ethernet connection, for example, you can keep a Wi-Fi adapter installed but disabled. That configuration gives you the option to enable the device and use the wireless adapter to connect to a mobile hotspot when the wired network goes out of service.
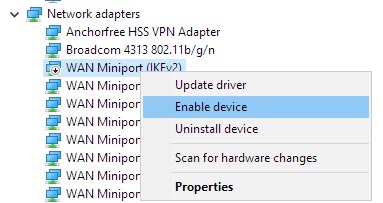
Right-click any active entry in Device Manager to see the Disable menu. To identify any device that is currently disabled, look for the black, downward-pointing arrow over its icon in Device Manager, as shown here. To turn a disabled device back on, right-click its entry in Device Manager and then click Enable.
Adjusting advanced device settings
As we mentioned earlier, some devices include specialized tabs in the properties dialog box available from Device Manager. Controls on these additional tabs allow you to change advanced settings and properties for devices. For example:
- Network cards, modems, input devices, and USB hubs often include a Power Management tab that allows you to control whether the device can force the computer to wake up from Sleep mode. This option is useful if you have fax capabilities (yes, some businesses still use faxes) enabled for a modem or if you use the Remote Desktop feature over the Internet on a machine that isn't always running at full power. On both portable and desktop computers, you can also use this option to allow Windows to turn off a device to save power.
- The Volumes tab for a disk drive contains no information when you first display the properties dialog box for that device. Click the Populate button to read the
volume information for the selected disk and click the Properties button to check the disk for errors, run the Defrag utility, or perform other maintenance tasks.
Although you can perform these same tasks by right-clicking a drive icon in File Explorer, this option might be useful in situations where you have multiple hard
disks installed and you suspect that one of those disks is having mechanical problems. Using this option allows you to quickly see which physical disk a given volume
is stored on.
Caution:
DVD drives offer an option to change the DVD region, which controls which discs can be played on that drive. The DVD Region setting actually increments a counter on the physical drive itself, and that counter can be changed only a limited number of times. Be extremely careful with this setting, or you might end up losing the capability to play any regionally encoded DVDs in your collection. - When working with network cards, you can often choose from a plethora of settings on an Advanced tab. Randomly tinkering with these settings is almost always counterproductive; however, you might be able to solve specific performance or connectivity problems by adjusting settings as directed by the device manufacturer or a Microsoft Support article.