Make Taped Photo Effect
Today's I am going to show you how to add a simple taped down effect to your photos.
Step 1: Open up a photo on which you want to add this taped down effect.
Place it to document which have you created in first step.

Step 2: So, we are going to rotate this picture a bit.
Go to Edit> Free Transform (shortcut key of 'Free Transfort Ctrl+T').

Step 3: We will make a tape. First create a new layer.
Then by using Rectangular Marquee Tool make a selection.
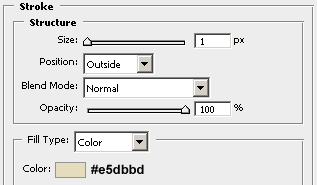
Fill it with white and press Ctrl+D for deselect the selection. Now go to Layer> Layer Style> Stroke and apply the following setting:
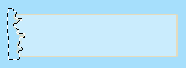
Now change the Fill of the layer to '40%'. After this your tape looks like:

Step 3: By using Lasso Tool make a selection like a picture shown below and press Delete.
This will add cut off effect to our tape.
Now go to Select> Deselect (Shortcut key Ctrl+D). Here's your result:

Repeat this process for the other side.

Step 4: Duplicate this layer by three times by press Ctrl+J and place each layer on different corner.
Rotate them Edit> Free Transform (Ctrl+T) so that they fit into your photo.
Here's the final result!