
Using the Ruler
When you create a document, Word creates page margins automatically. However, if you want to adjust the left and right page margins, or define how far the Tab key indents text, you need to use the Ruler. By default, Word hides the Ruler to avoid cluttering up the screen. To display the Ruler, click the View Ruler icon. To hide the Ruler from view, just click the View Ruler icon again.
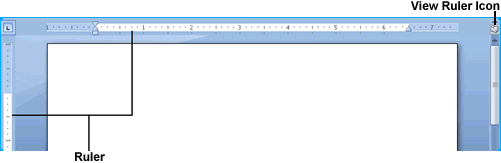
The Ruler defines the margins and indentation for your document.
Adjusting left and right paragraph margins
The Ruler defines the left and right margins for your paragraphs. To change these paragraph margins, follow these steps:
- Make sure the Ruler appears visible and then select any text.
- Move the mouse pointer over the Left Indent icon on the Ruler, hold down the left mouse button, and drag (move) the mouse
to the right to adjust the left paragraph margin. Word displays a dotted vertical line to show you where the new left paragraph
margin will be, as shown in Figure below.

Dragging the Left Indent icon lets you define a new left page margin for an entire document or just selected text. - Release the left mouse button when you are happy with the position of the left paragraph margin.
- Move the mouse pointer over the Right Indent icon on the Ruler, hold down the left mouse button, and drag (move) the mouse to the left to adjust the right paragraph margin. Word displays a dotted vertical line to show you where the new right paragraph margin will be.
- Release the left mouse button when you are happy with the position of the right paragraph margin.
Defining indentation with the Ruler
The two icons on the Ruler that define indentation are the First Line Indent and the Hanging Indent icons. The First Line Indent icon defines the position of the first line of every paragraph. The Hanging Indent icon defines the position of every line of text except for the first line, as shown in Figure below.
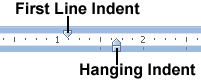
Drag the icons to set the indentation.
To define the first line and hanging indent, follow these steps:
- Make sure the Ruler appears visible and then select any text.
- Move the mouse pointer over the Left Indent icon on the Ruler, hold down the left mouse button, and drag (move) the mouse to the right. Word displays a dotted vertical line to show you where the new indentation margin will be.
- Release the left mouse button when you are happy with the position of the left indentation of your text.
- Move the mouse pointer over the First Line Indent icon on the Ruler, hold down the left mouse button, and drag (move) the mouse to the right (or left). Word displays a dotted vertical line to show you where the new first line indentation will be.
- Release the left mouse button when you are happy with the position of the first line indent position.