Changing a Document's Theme
You can enhance the look of a document by applying one of Word's pre-defined themes. A theme is a combination of colors, fonts, and effects that project a certain feeling or tone. For example, the Flow theme uses a palette of blues and greens, the Calabri and Constantia fonts, and understated effects.
You apply a theme to the entire document by clicking the Themes button in the Themes group on the Page Layout tab, and then making a selection from the Themes gallery. If you like the colors of one theme and the fonts of another, you can mix and match theme elements. First find the theme that most closely resembles the look you want, and then in the Themes group, change the colors by clicking the Theme Colors button or the fonts by clicking the Theme Fonts button.
If you create a combination of colors and fonts that you would like to be able to use with other documents, you can save the combination as a new theme. By saving the theme in the default Document Themes folder, you make the theme available in the Themes gallery. However, you do not have to store custom themes in the Document Themes folder, you can store them anywhere on your hard disk, on removable media, or in a network location. To use a theme that is stored in a different location, you can click the Themes button, and then click Browse For Themes at the bottom of the gallery. Locate the theme you want in the Choose Theme Or Themed Document dialog box, and then click Open to apply that theme to the current document.
Click Search Office Online at the bottom of the Themes gallery to display the Templates page of the Microsoft Office Online Web site, where you can find more information about themes and download themes and templates created by other people.
In this section, you will apply a theme to an existing document and then change the colors and the fonts. You will then save the custom theme.
- On the Page Layout tab, in the Themes group, click the Themes button. The Themes gallery opens.
- Hover over each thumbnail in turn to display a live preview of the theme.
- In the Themes gallery, click Apex. The colors and fonts change to those defined for the selected theme.
- In the Themes group, click the Theme Colors button. The Theme Colors gallery opens. The currently selected colors have a border around them.
- Display a live preview of any set of colors that interests you, and then in the gallery, click Opulent. The Opulent colors replace the Aspect colors, but nothing else in the document changes.
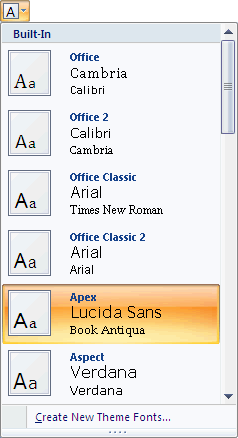
- In the Themes group, click the Theme Fonts button. The Theme Fonts gallery opens. The currently selected fonts are highlighted.
Each built-in option includes a set of two fonts the first is used for headings and the second for text.

- Display a live preview of any set of fonts that interests you, and then in the gallery, click Civic. The Civic fonts replace the Apex fonts, but the colors remain the same.
- In the Themes group, click the Themes button, and then below the gallery, click Save Current Theme. The Save Current Theme dialog box opens, displaying the Document Themes folder in the Address bar. This dialog box resembles the Save As dialog box. The Document Themes folder is the default location for saving any new themes you create.
- In the File name box, replace the suggested name with My First Theme, and then click Save.
- In the Themes group, click the Themes button to display the gallery. Your new theme appears at the top of the gallery, under Custom. You can now apply this theme to any document and in the end press to close the gallery without making a selection.
