
Troubleshooting Connected Devices
There are only a few ways that you can connect devices to your iPhone: using the headset jack, the dock connector, or Bluetooth. Although the number of devices you can connect is relatively limited, that doesn't mean you might never have problems with those devices.
If you are having trouble with a device attached to your iPhone, the good news is that a fair chunk of those problems have a relatively limited set of causes. You may be able to get the device back on its feet by attempting a few tried-and-true remedies. If it is not immediately obvious what the problem is, then your hardware troubleshooting routine should always start with these very basic techniques:
- Check connections, power switches, and so on:
Some of the most common (and most embarrassing) causes of hardware problems are the simple physical things, so make sure that a device is turned on and check that cable connections are secure. For example, if you can't access the Internet through the Wi-Fi connection on your iPhone, make sure your network's router is turned on. Also make sure that the cable between your router and the ISP's modem is properly connected. - Replace the batteries:
Wireless devices such as headsets really chew through batteries, so if such a device is working intermittently (or not at all), always try replacing the batteries to see if that solves the problem. - Turn the device off and then on again:
You power cycle a device by turning it off, waiting a few seconds for its innards to stop spinning, and then turning it back on. You'd be amazed how often this simple procedure can get a device back up and running. For a device that doesn't have an On/Off switch, try either unplugging it from the power outlet or removing and replacing the batteries. - Reset the device's default settings:
If you can configure a device, then perhaps some new setting is causing the problem. If you recently made a change, try returning the setting back to its original value. If that doesn't do the trick, most configurable devices have some kind of Restore Default Settings option that enables you to quickly return them to their factory settings. - Upgrade the device's firmware:
Some devices come with firmware a small program that runs inside the device and controls its internal functions. For example, all routers have firmware. Check with the manufacturer to see if a new version exists. If it does, download the new version and then see the device's manual to learn how to upgrade the firmware.
Updating software
The iPhone software should check for available updates from time to time when you connect it to your computer, provided the computer has an Internet connection. This is another good reason to sync your iPhone regularly. The problem is, you might hear about an important update that adds a feature you are really looking forward to or perhaps fixes a gaping security hole. What do you do if iTunes is not scheduled to check for an update for a few days?
In that case, you take matters into your own hands and check for updates yourself.
You can check for updates right on your iPhone by following these steps:
- On the Home screen, tap Settings: The Settings app appears.
- Tap General: Your iPhone displays the General options screen.
- Tap Software Update: Your iPhone begins checking for available updates. If you see the message "Your software is up to date," then you can move on to bigger and better things.
- If an update is available, tap Download and Install: Your iPhone downloads the update and then proceeds with the installation, which takes a few minutes.
Here is the iTunes route:
- Connect your iPhone to your computer. iTunes opens and connects to your iPhone.
- Click your iPhone in the Devices list.
- Click the Summary tab.
- Click Check for Update. iTunes connects to the Apple servers to see if any iPhone updates are available. If an update exists, you see the iPhone Software Update dialog, which offers a description of the update.
- Click Next. iTunes displays the Software License Agreement.
- Click Agree. iTunes downloads the software update and installs it.
Restoring data and settings
Sometimes your iPhone goes down for the count because its settings have become corrupted. In that case, you can attempt to fix the problem by restoring iPhone to its original settings. The best way to go about this is to use the Restore feature in iTunes because that enables you to make a backup of your settings. However, it does mean that your iPhone must be able to connect to your computer and be visible in iTunes.
Follow these steps to restore your iPhone:
- Connect your iPhone to your computer.
- In iTunes, click your iPhone in the Devices list.
- Click Sync. This ensures that iTunes backs up your iPhone and has copies of all the data from your iPhone.
Remember:
If you have confidential or sensitive data on your iPhone, that data becomes part of the backup files and could be viewed by some snoop. To prevent this, select the Summary tab's Encrypt iPhone backup check box, and then use the Set password dialog to specify your decryption password. Then right-click your iPhone in the Devices list and click Back Up. - Click the Summary tab.
- Click Restore. iTunes asks you to confirm you want to restore.
- Click Restore. iTunes downloads the software and restores the original software and settings. When your iPhone restarts, iTunes connects to it and displays the Set Up Your iPhone screen, as shown below.
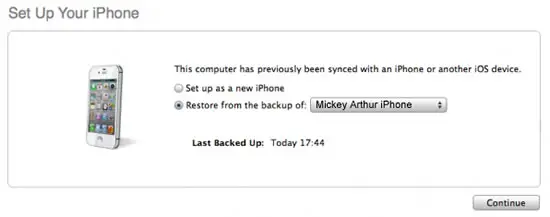
- Select the Restore from the backup of option.
- If you happen to have more than one iPhone backed up, use the list to choose yours.
- Click Continue. iTunes restores your backed-up data, restarts your iPhone, and syncs it.
- Go through the tabs and check the sync settings to make sure they are set up the way you want.
- If you made any changes to the settings, click Apply. This ensures that your iPhone has all its data restored.
Putting your iPhone in Device Firmware Upgrade mode
In some rare cases, your iPhone goes utterly haywire, where not only does iTunes not recognize the device, but even completely resetting it doesn't solve the problem. (This sort of scenario occurs most often if you have tried something naughty, such as jailbreaking your iPhone.) If this happens, you can still recover everything, but you have to do it using a special hardware mode called Device Firmware Upgrade (DFU). This mode essentially bypasses the current OS installed on the phone (which is good because in this scenario your current OS is toast) and tells iTunes to install a factory-fresh version of the OS. You can then restore your stuff as described in the previous section.
Follow these steps to put your iPhone into DFU mode:
- Turn off your iPhone.
- Connect your iPhone to your Mac or Windows PC.
- Launch iTunes.
- Press and hold down the Sleep/Wake and Home buttons for exactly 10 seconds.
- After 10 seconds, release the Sleep/Wake button, but continue to hold down the Home button for another 10 seconds.
- After 10 seconds, release the Home button. iTunes now recognizes your iPhone and displays the dialog.
When you boot your iPhone in DFU mode, iTunes recognizes the phone and displays this dialog to remind you to restore it. - Click OK.
- Click Restore. iTunes asks you to confirm.
iTunes asks you to confirm that you want to revert to the iPhone factory settings. - Click Restore and Update. iTunes restores your iPhone to the factory state.
If you need to exit DFU mode before restoring your iPhone, hold down the Sleep/Wake and Home buttons for 10 seconds. If that doesn't work for some reason, or if you find your iPhone is stuck in DFU mode, then you need to download and install a program called QuickPwn from http://blog.iphone-dev.org. Disconnect your iPhone, run QuickPwn, and wait until it prompts you to connect. Connect your phone and then follow the instructions that QuickPwn provides.