
Connecting to a Wi-Fi Network
Connections to a cellular network are automatic and occur behind the scenes. As soon as you switch on your iPhone, it checks for an LTE signal. If it finds one, it connects to the network and displays the LTE icon in the status bar, as well as the connection strength (the more bars, the better). If your current area doesn't do the LTE thing, your iPhone tries to connect to the slower 3G network. If that works, you see the 3G icon in the status bar and the connection strength. If there's no 3G network in sight, your iPhone tries to connect to a slower EDGE network instead. If that works, you see the E icon in the status bar (plus the usual signal strength bars). If none of that works, you see No Signal, so you might as well go home.
Making your first connection
Things aren't automatic when it comes to Wi-Fi connections, at least not at first. As soon as you try to access something on the Internet - a website, your e-mail, a Google Map, or whatever - your iPhone scours the surrounding airwaves for Wi-Fi network signals. If you've never connected to a Wi-Fi network, or if you're in an area that doesn't have any Wi-Fi networks that you've used in the past, you see the Select a Wireless Network dialog, as shown in Figure below. If you don't see the Select a Wireless Network dialog, you can still connect to a wireless network.
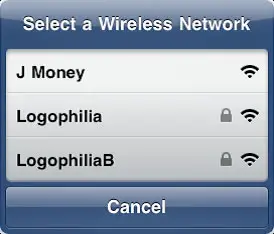
This dialog displays a list of the Wi-Fi networks that are within range. For each network, you get three tidbits of data:
- Network name. This is the name that the administrator has assigned to the network. If you're in a coffee shop or similar public hot spot and you want to use that network, look for the name of the shop (or a variation on the name).
- Password-protection. If a Wi-Fi network displays a lock icon, it means that it's protected by a password, and you need that password to make the connection.
- Signal strength. This icon gives you a rough idea of how strong the wireless signals are. The stronger the signal (the more bars you see, the better the signal), the more likely you are to get a fast and reliable connection.
Follow these steps to connect to a Wi-Fi network:
- Tap the network you want to use. If the network is protected by a password, your iPhone prompts you to enter it.
- Use the keyboard to type the password.
- Tap Join. The iPhone connects to the network and adds the Wi-Fi Network Signal Strength icon to the status bar.
Connecting to known networks
Your iPhone remembers any Wi-Fi network to which you connect. So, if the network is one that you use all the time - for example, your home or office - your iPhone makes the connection without so much as a peep as soon as that network comes within range.
Connecting to a hidden Wi-Fi network
Each Wi-Fi network has a network name - often called the Service Set Identifier, or SSID - that identifies the network to Wi-Fi-friendly devices, such as your iPhone. By default, most Wi-Fi networks broadcast the network name so that you can see it and connect to it. However, some Wi-Fi networks disable network name broadcasting as a security precaution. The idea here is that if an unauthorized user can't see the network, he or she can't attempt to connect to it. (However, some devices can still pick up the network name when authorized computers connect to it, so this is not a foolproof security measure.)
You can still connect to a hidden Wi-Fi network by entering the connection settings by hand. You need to know the network name, its security and encryption types, and the network password. Here are the steps to follow:
- On the Home screen, tap Settings to open the Settings app.
- Tap Wi-Fi. You see the Wi-Fi Networks screen.
- Tap Other. Your iPhone displays the Other Network screen.
- Type the network name in the Name text box.
- Tap Security to open the Security screen.
- Tap the type of security used by the Wi-Fi network: WEP, WPA, WPA2, WPA Enterprise, WPA2 Enterprise, or None.
- Tap Other Network to return to the Other Network screen. If you chose WEP, WPA, WPA2, WPA Enterprise, or WPA2 Enterprise, your iPhone prompts you to type the password.
- Type the password in the Password text box.
- Tap Join. The iPhone connects to the network and adds the Wi-Fi Network Signal Strength icon to the status bar.
Stopping incessant Wi-Fi network prompts
The Select a Wireless Network dialog is a handy convenience if you're not sure whether a Wi-Fi network is available. However, as you move around town, you may find that dialog popping up all over the place as new Wi-Fi networks come within range. This constant tapping of the Cancel button can wear down your finger to the bone. However, you can just tell your iPhone to shut up already with the Wi-Fi prompting. Here's how:
- On the Home screen, tap Settings. The Settings app appears.
- Tap Wi-Fi. iPhone opens the Wi-Fi Networks screen.
- Tap the Ask to Join Networks switch to Off. Your iPhone no longer prompts you with nearby networks.
How do I connect to a Wi-Fi network if I don't even know it's there? That's a good question, and here's a good answer:
- On the Home screen, tap Settings. Your iPhone displays the Settings app.
- Tap Wi-Fi. The Wi-Fi Networks screen appears, and the Choose a Network list shows you the available Wi-Fi networks.
- Tap the network you want to use. If the network is protected by a password, your iPhone prompts you to enter it.
- Use the keyboard to tap the password.
- Tap Join. The iPhone connects to the network and adds the Wi-Fi Network Signal Strength icon to the status bar.
Forgetting a Wi-Fi network
Having the iPhone remember networks you've joined is certainly convenient, except, of course, when it's not. For example, if you have a couple of networks nearby that you can join, you might connect to one and then realize that the other is better in some way (for example, it's faster or cheaper). Unfortunately, there's a good chance your iPhone will continue to connect to the network you don't want every time it comes within range, which can be a real hassle. Rather than threatening to throw your iPhone in the nearest trash can, you can tell it to forget the network you don't want to use. Here's how it's done:
- On the Home screen, tap Settings. The Settings app appears.
- Tap Wi-Fi. The iPhone opens the Wi-Fi Networks screen.
- If you're not currently connected to the network you want your iPhone to forget, connect to that network.
- Tap the blue More Info icon to the right of the network. Your iPhone displays the network's settings screen.
- Tap Forget this Network. Your iPhone asks you to confirm.
- Tap Forget. Your iPhone discards the login data for the network and no longer connects to the network automatically.
Turning off the Wi-Fi antenna
Your iPhone's Wi-Fi antenna is constantly on the lookout for nearby Wi-Fi networks. That's useful because it means you always have an up-to-date list of networks to check out, but it also takes its toll on the iPhone battery. If you know you won't be using Wi-Fi for a while, you can save some battery juice for more important pursuits by turning off your iPhone's Wi-Fi antenna. Here's how:
- On the Home screen, tap Settings. The Settings app appears.
- Tap Wi-Fi. The Wi-Fi Networks screen appears.
- Tap the Wi-Fi switch to Off. Your iPhone disconnects from your current network and hides the Choose a Network list.
When you're ready to resume your Wi-Fi duties, return to the Wi-Fi Networks screen and tap the Wi-Fi switch to On.