
Accessibility
Apple wanted to make sure everyone could use the iPhone as easily as possible. To that end, Apple built in accessibility features to help people with disabilities use the iPhone. To see all the accessibility options, on the iPhone go to Settings → General → Accessibility. Let's go through these settings one by one.
As you can see when looking at the Accessibility settings, Apple has divided the options into three main categories: Vision, Hearing, and Physical & Motor.
VoiceOver
With VoiceOver turned on, a user simply touches the screen to hear a description of what is beneath his finger and then double-taps to select the item. With VoiceOver enabled, the iPhone speaks when the user has a new e-mail message and can even read the e-mail to the user. This is in addition to the ability for Siri to read e-mail messages.
It's important to remember that when VoiceOver is turned on, the iPhone's Multi-Touch gestures change. As a matter of fact, when VoiceOver is enabled, pretty much all of the gestures. The Voice Over settings are also where you can pair your iPhone with a Braille device.
VoiceOver Gestures
List common VoiceOver gestures here, but be sure to carefully read Apple's VoiceOver article at http://support.apple.com/kb/HT3598 for complete VoiceOver gesture controls.
Tap: Speaks the selected item.
Double-tap: Activates the selected item.
Triple-tap: Acts as a double-tap normally would. Triple-tapping an item when VoiceOver is enabled effectively double-taps that item.
Flick right or left: Selects the next or previous item.
Two-finger tap: Stops speaking the current item.
Two-finger flick up: Reads all text or items from the top of the screen.
Two-finger flick down: Reads all text or items from the current position.
Three-finger flick up or down: Scrolls one page at a time.
Three-finger flick right or left: Goes to the next or previous page (such as the Home screen pages, Weather pages, or Safari web pages).
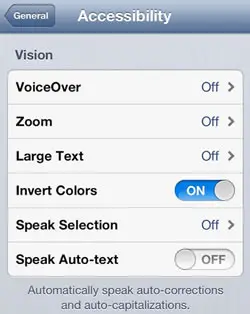
Zoom
Zoom allows those impaired vision to magnify their entire screen. This is different from the standard pinch-and-zoom features of the iPhone's regular software. Accessibility Zoom magnifies everything on the screen, allowing the user to zoom into even the smallest of buttons. When this option is selected, the user double-taps any part of the iPhone's screen with three fingers to automatically zoom in 200 percent. When zoomed in, you must drag or flick the screen with three fingers. Also, when you go to a new screen, zooming always returns you to the top middle of the screen.
Large Text
Large Text allows those with vision impairments to enlarge the text in alerts, Contacts, Mail, and Notes. They can choose from 20-, 24-, 32-, 40-, 48-, or 56-point text (12-point text is the normal text you see on a web page).
White on Black
For some people with vision difficulties, inverting the color of a computer screen so it resembles a photographic negative allows them to read text better. Turning on White on Black does just this.
Speak Selection
With this option selected, any selected text (such as the text you select when copying and pasting) is spoken aloud.
Speak Auto-text
With this option selected, any autocorrection text (such as the spell-check pop-ups that appear when you are typing) is spoken aloud.
Mono Audio
With this selected, the stereo sounds of the left and right speakers or headphones are combined into a mono (single) signal. You can then choose which speaker, the left or the right, you want to hear the mono audio come from. This option lets users who have a hearing impairment in one ear hear the entire sound signal with the other ear.
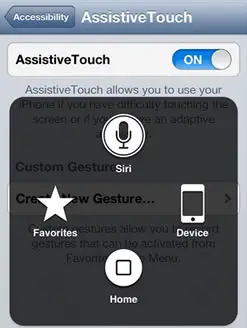
Assistive Touch
Apple recognizes that for people who have limited motor skills, using a small multitouch screen like the one found on the iPhone can be difficult. With this in mind, Apple created Assistive Touch. When Assistive Touch is enabled, a black-and-white dot is always displayed on the iPhone's screen.
Tapping the dot displays an on-screen menu overlay (Figure below) that allows users to tap icons that represent gestures. Instead of tapping or swiping with two fingers, Assistive Touch allows the user to simply tap a button that performs the gesture automatically.
Triple-Click Home
If you are sharing an iPhone with someone with disabilities, selecting this option allows users, by triple-clicking the iPhone's physical Home button, to quickly toggle VoiceOver, Zoom, White on Black, or Assistive Touch on or off. You can also set it so triple-clicking the Home button causes a pop-up to appear on-screen asking the user what accessibility feature they want to use.

NOTE:
With the exception of the triple-click home feature, all of these accessibility settings can also be configured from within the iPhone iTunes Preferences window on the Summary tab. Click Configure Universal Access to choose your settings.
Reset
At times, you may need to reset certain iPhone features via Settings → General → Reset. Each of the following options offers a slightly different twist on restoring your iPhone to factory conditions and provides a different degree of security.
Reset All Settings: This option returns all settings to those that are factory installed.
Erase All Content and Settings: This option deletes all content from your iPhone-music, calendar events, videos, contacts, and so forth-and resets your settings at the same time.
Reset Network Settings: This option restores your Wi-Fi network settings to the defaults. This ensures that your iPhone will not automatically connect to any "known" but dangerous network you might have once encountered.
Reset Keyboard Dictionary: This option "forgets" all words you have typed into your iPhone. The onboard keyboard dictionary is smart about learning the words and names that you type, but it also learns a lot of personal information (including passwords) at the same time. Tap this option to delete this dictionary from your system.
Reset Home Screen Layout: This resets your Home screen icon arrangement to the default one that shipped on your iPhone. Any thirdparty apps appear in alphabetical order starting on the second Home screen page. Any Web Clips also appear in alphabetical order mixed in with the third-party apps. Finally, any folders you created are deleted, and their apps all appear on the Home screens.
Reset Location Warnings: Any time an app (such as Facebook, Starbucks, Maps, and so on) wants to use your current location, it must first ask you for permission. Resetting the location warnings means every app on your iPhone has to ask for your permission again before it can use your current location.
iCloud
As previously mentioned, iCloud is Apple's cloud-based services that offers users free e-mail, calendar, and contacts on the Web. iCloud also allows you to automatically sync documents between all your devices, like your Mac or PC, your iPad, and your iPhone. iCloud works automatically and effortlessly in the background.
To enable iCloud on your iPhone, go to Settings → iCloud and enter your Apple ID and password. That's it. Now all your documents, e-mail, contacts, and calendars are synced wirelessly across all your iCloud-capable devices.
Third-Party App Settings
The remainder of the settings in the Settings app deal with third-party application settings. Any apps that adhere to Apple's developer policies keep their settings here (Figure below). Most apps do, but some don't. A lot of users think an app's settings should be contained in the app itself, and many developers end up doing just that. With that in mind, it's a good idea to check the Settings app to see whether you favorite apps have additional settings that aren't contained in the app. Also, note that virtually all games have their settings stored within the app, rather than under the iPhone Settings app.